Zuppa di Pesce allo Zafferano – Soupe de Poisson with Saffron


Zuppa-di-Pesce-allo-Zafferano---Soupe-de-Poisson-with-Saffron-1The French “soupe de poisson” is very famous and popular not only in France since in Italy, Spain and Croatia.

The original fish soup was prepared should be prepared with different kind of fish and seafood using the head, shells and fish bones for the fish stock first.

In our case I used what I had in the freezer: calamari, shrimps and fish filets; please free to change the kind and the quantities of the fish/seafood.

The shrimps were already deveined, but shell on: I remove the shell and used it for the basic fish broth.

The stomach of the calamari had been removed, I used the body and the tentacles for the soup but I used the other part of the head (I removed the eyes first!  for the basic fish broth as well.

No fish heads were available, but I found that it could work without them.

I used vegetables give flavor and thickness to the soup.

We enjoyed this soup with homemade bread and skordalia (Greek potatoes and garlic spread).

Note: if you don’t have fish bones… use a fish stock, you will need to cook the veggies (step 8) for only about 20 minutes or until done.

Zuppa di Pesce allo Zafferano - Soupe de Poisson with Saffron

  • Servings: 4
  • Difficulty: easy
  • Print

Autor: https://artandkitchen.wordpress.com/

Zuppa-di-Pesce-allo-Zafferano---Soupe-de-Poisson-with-Saffron-1

You need

  • 2-4 tablespoons olive oil
  • Shells, heads …
  • 1 onion finely chopped
  • 4 garlic cloves, peeled whole
  • 1 glass white wine
  • 4 cups of water
  • 1 carrot, chopped
  • 2 tomatoes, chopped
  • 1 potato, peeled and chopped
  • 1 bay leaf
  • 1 small spring thyme
  • Salt and pepper to taste
  • 1 pinch saffron
  • 250-500 g squid, used small ones
  • 500-700 g fish filets
  • 250-500 g shrimps
  • Parley for topping

Procedure

  1. First of all prepare the shells, heads or other parts of fish which would be suitable for the basic broth.
  2. Heat 2 tablespoons of oil in a deep pot and fry the shells, heads … until fragrant. Remove from pot and set aside.
  3. Heat other 2 tablespoons of olive oil, add onion as well as whole garlic cloves and cook until translucent.
  4. Add wine and let boil for a few minutes.
  5. Add water and bring to boil.
  6. Add water, carrot, tomato, potato, bay leaf and thyme. Bring to boil and season with salt and pepper.
  7. Place the fried shells, heads, fish bones… in small kitchen towel, close this with a knot or cord. And place this in the pot as well.
  8. Cover and let simmer for one hour, but remove bay after 10 minutes or so.
  9. During this thyme slice the squid, but fish in bite sized pieces and refrigerate until needed.
  10. Remove the bag with the fish and pressing out the precious juices.
  11. Blend the vegetables in the fish stock, if necessary sieve them to get a smoother base.
  12. Add saffron, fish and calamari. Cook for about 30 minutes more without stirring. Add more water if necessary to taste: you would like a creamy but not too heavy soup.
  13. Add shrimps, season again if necessary.
  14. Serve immediately topped with parsley.
  15. To go with this toasted bread, croutons or simply rustic bread.

Tuna Steak with Salsa


Tuna-Steak-with-Salsa-2

Cilantro and salsa lover will enjoy this refreshing and tasty fish dish and all veggie lovers will find their way to add more veggies and more colors to their plate.

For this special steak recipe we offer you the choice to try two different kind of salsa a South American one and a Bahamian one.

The key point for this recipes are: short marinating time with cilantro and lime, not overcook the tuna, fresh colored veggies and the great salsa for the fish, for the veggies and for the rice!

I listed the veggies I used, but there are many more you could add as fresh sliced champignons (toss with lime in advance to prevent browning), sliced carrots (eventually boil them for 5 minutes in advance and let cool down), any green salads, boiled green beans, boiled corn…. Only to mention some more.

I did not add garlic and chopped tomatoes to the salsa, but this would be a possibility as well, I used mini peppers which were perfect to be filled with the salsa, but other veggies as small tomatoes, carved zucchini  would be perfect as well, even if not really necessary.

Now it’s your turn to try this out and adapt it to the ingredients you have on hand.

P.S. You can prepare this as starter using one quarter of steak and a few colorful veggies for each.

Tuna Steak with Salsa

  • Servings: 4
  • Difficulty: easy
  • Print

Autor: https://artandkitchen.wordpress.com/Tuna-Steak-with-Salsa-1

You need

Fish and marinade

  • 4 tuna fish steaks
  • 2 tablespoon lime juice
  • 2 teaspoons fresh cilantro finely chopped
  • 2 garlic cloves, grated or pressed
  • 4 tablespoons olive oil

Veggies (suggestion)

  • 1 avocado, sliced and brushed with lime juice to prevent browning
  • Cherry tomatoes or other small tomatoes, slice
  • Mini peppers, halved and seeded
  • 1/2 small red onion, sliced, soaked in cold water for 20 minutes

Salsa (South American)

  • 1 lime, juice
  • 1 cup olive oil
  • 1/2 small red onion, finely chopped
  • 1 red pepper, chopped
  • 2 tablespoons fresh cilantro, chopped
  • Tabasco, chili or red pepper flakes to taste
  • Salt and pepper to taste

Salsa (Bahamian variation):

  • 1 Small Onion, diced
  • 1 Tomato, diced
  • 1/2 small green pepper, diced
  • 1/4 teaspoon each salt and pepper
  • 1 cup Mango, diced small

Additional suggestion

  • Plain white rice

Procedure

  1. Place your tuna steaks in a bowl or simply on a plate, in a small bowl combine well the ingredients for the marinade, pour it over the fish and spread it over both sides. Let marinate for about 20 minutes.
  2. During marinating time prepare the rice (will need 20 minutes to be done) if not already done in advance.
  3. Slice your veggies and arrange them on the plates.
  4. Prepare the ingredients of for the salsa in a small bowl.
  5. When the rice is almost done heat a char-grill pan.
  6. Char-grill or grill the tuna steaks on a high heat for about 2-3 minutes on each side (3 minutes if you prefer the tuna to be more thoroughly cooked.)
  7. Transfer tuna on the single plates with the vegetables and serve it immediately with the salsa over both fish and vegetables. I filled the small halved peppers with some extra salsa.

Serve with rice if desired.

Tuna-Steak-with-Salsa-3


Shrimps Saganaki with Vegetables – γαρίδες σαγανάκι με λαχανικά

Shrimps-Saganaki-with-Vegetables-6

In Greece the most famous saganaki is the cheese saganaki or Tyri Saganaki a dish that you can find as appetizer in many restaurants.  There are many other saganaki recipe one of them is the delicious  shrimps saganaki ( γαρίδες σαγανάκι, garides saganaki) recipe shrimps and Feta cheese.  We should also mention the mussels saganaki (μύδια σαγανάκι, midia saganaki), calamari saganaki (Σουπιές σαγανάκι, supies saganaki), eggplant saganaki (Μελιτζάνες σαγανάκι, melitzanes saganaki) and many more recipes with vegetables (as Σαγανάκι με λαχανικά χωριάτικο και ανθότυρο, vegetables saganaki with white cheese).

What is a saganki? These kind of dishes have been named by the small frying (saganaki = diminutive of sagani) pan used to prepare this delish, these metal frying pan are provided by one or two handles (no wood or plastic handles) and are suitable for the stove as well for the oven. “Sagan” comes from the Turkish word sahan ‘copper dish’, itself borrowed from Arabic صحن (ṣaḥn).

The same phenomenon happened with the word “paella” (Spanish, https://en.wikipedia.org/wiki/Paella) and “tiella” (Italian, http://cucina.grandinetti.org/recipes/sides-and-vegetables/tiella).

Today as I was coming home from work started to plan our supper. We had quite warm days during the last two weeks, but evening, after sun disappeared, we feel that the winter is approaching and I wish a warm place. And what’s the best? The fireplace, the chimney! OK, and how with the dinner? No problem, I’m used to handle with the fire and I will prepare the dinner on the open fire.  It was in that way that I created this recipe, an almost summer recipe, with summer vegetables, with shrimps and with the heat of the fire.

I have a paella pan, which is perfect for 3-5 persons and I can use this as saganaki (or sagani, as it is not “small”).

In the freezer I had a portion of shrimps, the vegetables were already at home and I also had a great homemade bread which was perfect to be combined with this dish.

The flavor was fantastic and smoked component made this dish even better.

If you don’t have a chimney, you can work on the stove top and after adding the feta and shrimps, place pan in the preheated oven. I suppose that with the BBQ may work as well, if provided of lid.

Shrimps Saganaki with Vegetables

  • Servings: 4-6
  • Difficulty: medium
  • Print

Autor: https://artandkitchen.wordpress.com/

Shrimps-Saganaki-with-Vegetables-5

You need:

  • 3 tablespoons olive oil
  • 4 big onion, sliced
  • 4 garlic cloves, chopped
  • 1 big eggplant, diced
  • 1 zucchini, diced
  • 1 red pepper, sliced
  • 1/2 cup dry white wine
  • 1 cup salted water
  • salt and pepper, to taste
  • 200-300 g feta, crumbled
  • 24 medium shrimp, deveined

Procedure:

This procedure had been performed on the open fire, you can prepare the recipe on the stove (or in the oven under the broiler) and from step 7 in the preheated oven (220°C/430°F) or continue on the stove covering the pan with a lid.

  1. Heat oil in a fireplace proofed skillet as a paella pan.
  2. Add onions and stir fry until they change the color.
  3. Add garlic and eggplants. Stir fry until they start to turn soft
  4. Add zucchini and peppers, stir fry again for about 5 minutes.
  5. Add salted water and cook until zucchini becomes to turn soft, but not too much.
  6. Add salted water, season with salt and pepper and bring to boil.
  7. Now it’s time for the last step: add crumbled feta and shrimps. When the shrimps turn pink, the saganaki is ready! Enjoy with bread!

Variations/Suggestions:

  • Broth instead salted water
  • In not on the fire add little smoked paprika
  • Vegetables of your choice, roasted cherry tomatoes are wonderful
  • Replace with water
  • Add ouzo
  • Eggs instead of shrimps (for vegetarians)
  • Prepare in the oven on single ramequins molds
  • Combine with noodles
  • Top with parsley
  • Serve with lemon wedges

This slideshow requires JavaScript.

Risoni Paella with Shrimps and Artichokes

Risoni-Paella-with-Shrimps-and-Artichokes

From time to time I prepare a paella with rice but last year during my vacations in Andalusia I saw paellas with pasta as well. Finally, after about one year, I decided to try this with risoni (orzo pasta) and now I know that this is wonderful variation that merits to be taken in consideration for every kind of paella as well.

I prepared this form scratch with the ingredients I had on hand and the result was fantastic!

Risoni Paella with Shrimps and Artichokes

  • Servings: 2-3
  • Difficulty: easy
  • Print

Autor: https://artandkitchen.wordpress.com/

Risoni-Paella-with-Shrimps-and-Artichokes


You need

  • 1 tsp of olive oil
  • 1 onion, sliced
  • 1 red bell pepper, thinly sliced
  • 1 cup risoni (orzo pasta), o other small pasta
  • 1/4 cup of white wine
  • 3 1/2 cups chicken broth
  • 1 pinch of saffron threads
  • Smoked paprika, to taste
  • Salt and pepper, to taste
  • ½ cup of frozen peas or frozen green beans (if using green beans add them already with the stock!)
  • 1 small can of artichokes hearts, quartered
  • 12-16 shrimps

Procedure:

  1. Heat olive oil in a wide non-sticky skillet and fry onion and red pepper until onions are translucent.
  2. Add risoni and roast for a few minutes.
  3. Add wine and cook until adsorbed.
  4. Add chicken broth, saffron and paprika and season with salt and pepper. Cover and let simmer stirring from time to time.
  5. After 10 minutes add peas, stir. Add salted water or little white wine if during cooking time all the liquid is adsorbed and the dish would turn too dry.
  6. Just before pasta is cooked (cooking time depends from the kind and size of the pasta) arrange artichokes and shrimps.
  7. Cover and cook until pasta is done and shrimps turn pink and are done.

Salmon in Herbed Cream Sauce

Salmon-in-Herbed-Cream-Sauce

Salmon is one of the most popular fishes as taste and the pink color makes it very attractive

It is very healthy as well as it is rich of omega-3 fatty acids.

In Quebec as well in France this fish is prepared in many different ways as it is very versatile and easy to find it in the stores.

This quick recipe has been adapted from a ham rolls recipe, baked with cream, vine and herbs (clear French inspiration), I hope you will like it!

Salmon in Herbed Cream Sauce

  • Servings: 2-4
  • Difficulty: easy
  • Print

Autor: https://artandkitchen.wordpress.com/

Salmon-in-Herbed-Cream-Sauce

You need

  • 600-800 g Salmon filet (I removed the skin with the knife in advance, but it is not necessary), about 1 1/2 pounds or more if you like
  • 1 cup heavy cream
  • 3 tablespoons tomatoes concentrate
  • 1/4cup heavy red wine as Bordeaux
  • 3 tablespoons Cognac or other brandy
  • 2 teaspoons cornstarch
  • 2 teaspoons “herbes de Provence” or other herbs mix as you like (I suggest to add some fresh savory if you have it!)
  • Worcestershire sauce or soy sauce, to taste
  • Salt and pepper, to taste
  • 2 spring onions, thinly sliced (mine were violet at the base)

Procedure

  1. Preheat the oven to 180°C/350°F
  2. Prepare the salmon removing the skin if preferred (I recommend it as you will not eat the skin!).
  3. In a small bowl combine, cream, tomatoes concentrate, wine, cognac, cornstarch, herbs, and Worcestershire sauce. Adjust to taste with salt and pepper,
  4. Pour a few tablespoons of sauce in a baking mold and arrange salmon pieces. Pour rest of sauce over fish and bake it at 180°C/350°F for about 20 minutes until just done.
  5. Remove from oven, top with spring onions and serve immediately.

Prawn in Rich Yogurt Curry Sauce

Prawn in Rich Yogurt Curry Sauce

With the recent discovering of always new recipes, we have come to search for new and forget the good oldies.  There is, indeed, no intrinsic reason why we should ALWAYS try new recipes and look only forward. Remembering should be given precedence over forgetting; in my case already proofed recipes should be checked again and made again. Writing down these recipes is a way to prevent forgetting about them and passing them further to my children and my friends.

For this reason, I made this curry with minor changing again and doubling the sauce. Definitely worth to make it again!

Focus in this recipe is the creamy sensual sauce that should be enjoyed with chapattis eating with the fingers!

Let me start the description of this recipe with the preparation of the ingredients because this dish is quick done.  Be sure you have the chapattis ready on time as well!

Prawn in Rich Yogurt Curry Sauce

  • Servings: 4
  • Difficulty: easy
  • Print

Autor: https://artandkitchen.wordpress.com/

Prawn in Rich Yogurt Curry Sauce

You need

  • 500 g large shrimp (big prawn, peeled, frozen or fresh)
  • 2 tablespoon vegetal oil
  • 1 spring onions, sliced
  • 1 shallot, chopped
  • 2 garlic cloves, chopped
  • 1 tablespoon ginger, peeled and finely chopped
  • 1 chili, hot red thinly sliced
  • 3 tablespoons tomato puree
  • 1/2 lime, juice only
  • 1/2 cup Greek yogurt
  • 1/2 cup water
  • 1 teaspoon cornstarch
  • 1 teaspoon garam masala
  • 1 teaspoon ground turmeric
  • 1 tablespoon fresh cilantro, chopped
  • 1/2 teaspoon salt or to taste

To serve with:

  • Chapatti
  • Additional Greek yogurt
  • Sautee vegetables or other vegetable dish of your preference

Procedure

  1. Wash peel and clean shrimps, set aside.
  2. On small plate place spring onion, shallot, cloves ginger and chives.
  3. In a small bowl combine tomatoes purée, lime juice, Greek yogurt, water, cornstarch, garam masala and turmeric.
  4. Heat oil in a frying pan add the ingredients from the small plate (spring onion…).
  5. Stir fry until fragrant, this takes about 4 minutes.
  6. Add prawn and cook stirring from time to time until they change the color on both side, this takes about 3 minutes.
  7. Add the content of the small bowl (tomatoes puree…) and let it cook until it begins to bubble.
  8. Add cilantro stir, add salt to taste.
  9. Serve immediately with warm chapattis and additional yogurt. Garnish with cilantro leaves.

Gingered Fish

Gingered Fish 1

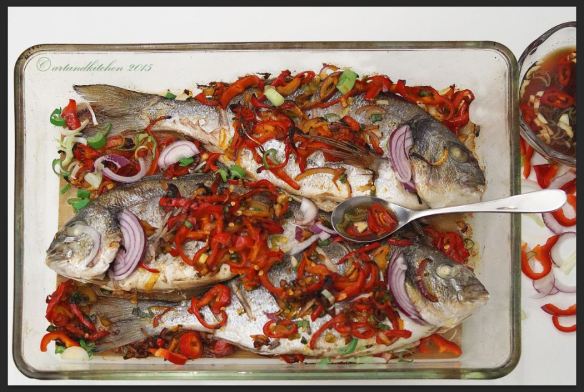
Once again this fabulous fish dish found it place on our table. The best is that I know that I will make it again and again.

The very first inspiration was a dish fish we got on a Thai island. The tangy tasty sauce was always more than welcome and the fish was prepared on charcoal (without veggies) or wrapped in banana leaves and cooked on the BBQ.

The fish, as fresh as best, should be cleaned first and marinated while you prepare the other ingredients. Are you ready with the ingredients? Now it’s time to start … you should work quickly!

Don’t forget to prepare some plain rice or other side dishes before!

Gingered Fish

  • Servings: 4
  • Difficulty: medium
  • Print

Autor: https://artandkitchen.wordpress.com/

Gingered Fish 1

You need

  • 2 -3 sea bream (about 3 pounds total or other whole fish), cleaned
  • 2 tablespoon oil

Dipping sauce

  • 2 tablespoons lime juice
  • 4 tablespoons soy sauce, light
  • Some chili strips, to taste
  • 1 garlic clove, thinly sliced
  • 1/2 teaspoon green onion slices (reserved from the vegetable topping)

Marinade

  • 1/2 teaspoon pepper
  • 1 tablespoon soy sauce, light
  • 1 tablespoon fresh ginger, grated
  • 1/4 teaspoon chili powder

Vegetable topping

  • 2 tablespoons oil
  • 1 tablespoon ginger, peeled, in very fine stripes
  • 1 garlic cloves, chopped
  • 1 red peppers, thinly sliced
  • 1 fresh chili peppers, seed removed in very fine stripes
  • 2 green onions, sliced (and/or 2 scallions and/or small red onion)

Procedure

  1. Be sure you have all the ingredients ready
  2. Pat dry the fish and with a sharp knife cut 2 or 3 into the flesh slightly on the thickest part.
  3. Add all ingredients for the marinade to the fish. Smear the marinade onto the fish on both sides and into the cavity as well as into the cuts. Place ginger fibers inside of the fish.
  4. Set aside for 20-30 minutes.
  5. Preheat at 250°C/480°F.
  6. Meanwhile prepare dipping sauce combining the listed ingredients, set aside.
  7. Now prepare your vegetables (ginger, garlic, pepper, chili, green onion or scallions) mix: heat oil in a non-sticky skillet at high temperature and fry ginger and garlic until fragrant (this takes 1-2 minutes). Add red pepper slices as well as chili and fry for other two minutes. Add green onions stir and set aside.
  8. Oil your baking mold and place the fish on it. Bake it at 250°C/480°F for about 6 minutes (o if it is a bigger fish) on the first side.
  9. Turn the fish with a large spatula and top with the vegetable mix.
  10. Bake for other 6-8 minutes or until just done.
  11. Take out of the oven and serve with the dipping sauce in a separate small bowl.


Gingered Fish 2

Trout Ceviche with Orange Juice

Trout Ceviche with Orange Juice 2

We enjoyed this trout ceviche with orange juice in the region of Cusco and as usual after our vacations I need to reproduce some of the dishes which impressed me most at home for a smoother change to our routine and to dream further. Dream we are still there, sitting in that places, looking around, smelling the specialties, admiring the colors, listening to the voices…  Please let us dream!

This dish will be the first of my Peruvian collection; I prepared this simply for us but I will be glad to share this with our friends and guest as well. I will bring this dish further, it will travel with me not only in my mind but it will find I place in Greece and impress our friends with this dish made of fresh high quality Cretan products as the best oranges of the world, the best olive oil and fresh fish (will use another kind of fish according the what I will get best)!

Trucha, or trout in English, are found throughout the waters of Andean Peru but are not a native species. This Rainbow Trout were introduced from Canada in order to provide poor Andean communities with a much needed boost of protein in their diets.

This fishes have not only survived, but thrived in many places across the country providing good and rich food to the population and for this reason you will find them in most of Andean restaurants.

In this way we have to opportunity to enjoy fresh ceviche not only near Peruvian coast.

We noticed that in Peru ceviche is served very fresh, the marinating time was reduce to minimum time and the fish flesh looked sometimes completely “raw”. I suggest to adapt marinating time the size (how thick) of the slices/bites on the kind of the fish and of course on your taste!

For additional information about marinating time check: http://www.seriouseats.com/2011/07/the-food-lab-ceviche-and-the-science-of-marin.html

Trout Ceviche with Orange Juice

  • Servings: 4
  • Difficulty: easy
  • Print

Autor: https://artandkitchen.wordpress.com/

Trout Ceviche with Orange Juice 1

You need

  • 150 g very fresh (sushi-grade) fish, such Rainbow Trout or other similar fish
  • 1 lime, fresh juice
  • 3 tablespoons finely diced red bell pepper
  • 1 1/2 tablespoons finely diced red onion
  • 1/2 teaspoon minced garlic (optional)
  • 1 small orange
  • 1 tablespoon fresh cilantro leaves, chopped
  • 1 tablespoon olive oil
  • 1/2 teaspoon salt
  • Lime wedges and additional cilantro leaves, for serving

Procedure

  1. Cut the fish into slices and arrange them on a dish.
  2. Combine in a bowl the lime juice, peppers, onions, and garlic, pour over the fish.
  3. Peel a strip of orange peel with the veggie peeler and cut to julienne.
  4. Scatter the zest and the cilantro over the fish.
  5. Cover and refrigerate as long as desired.
  6. Blend orange juice with it pulp and an additional small piece of zest and place in a small bowl.
  7. Add to the bowl the olive oil, and salt and combine well.
  8. Just before serving pour the orange sauce over the ceviche and garnish with reserved coriander leaves and lime wedges.

Trout Ceviche with Orange Juice 1

Teriyaki Salmon with Sesame

Teriaki Salmon with Sesame

A few month ago I learnt a new way to prepare salmon filets with skin: fist fry the filets skin side down until skin gets crispy, then place them under the broiler for a few minutes just until through.

The procedure is very easy and all what you need is to have all the other dishes ready so that you can work quickly and the salmon is broiled but still juicy and tender.

As side dish I suggest a mixture of veggies as stir fried vegetables with cilantro and ginger dressing or simply a salad and some plain rice. Enjoy!

You need:

  • 4 salmon pieces (200-300 g each)
  • 4 tablespoon teriyaki sauce
  • 4 tablespoon dark soy sauce (I used the sweet Indonesian one)
  • 1/4 teaspoon roasted sesame oil
  • 1 teaspoon brown sugar, or to taste
  • 4 tablespoon dry sherry
  • 1 tablespoon olive oil
  • Sesame seeds to sprinkle

Procedure:

  1. Marinate the fish with all the ingredients (except olive oil and sesame seeds) for about one hour. Let marinate skin side up!
  2. Heat broiler of your oven. Be sure you have baking mold for the oven ready.
  3. Heat oil to high temperature in a big skillet. The skillet should be wide enough for all pieces, if not use two skillets!
  4. Add fish skin side down and fry until skin gets crispy. This takes about 3 minutes.
  5. Transfer the fish to the baking mold and place under the broiler (distance about 10 cm). Pour marinade over the fish and sprinkle with sesame seed.
  6. Bake until through but still juicy. This takes about 7 minutes, depending from the thickness of the pieces.
  7. Serve immediately and enjoy.

Grilled Octopus

Grilled Octopus

I learned how to make grilled octopus many years ago, after enjoying it in a restaurant.

Now this one of our summer favorite seafood dishes and I prepare it often at home.

Octopus needs to be boiled before grilling it, but first of all you have to clean it!

You need

  • 2 pounds octopus, or the quantity you like (defrosted!)
  • Garlic clove (variations: bay leaf, sliced onions, parsley stems,…)
  • Water to boil (some people add little white wine)
  • 1/4 cup olive oil
  • 1/2 lemon juice only
  • 1/2 teaspoon oregano, optional (or fresh parsley chopped or smoked paprika)
  • Salt and pepper to taste

Preparation

  1. Cleaning:

Wash your octopus under current water, remove stomach, ink sac and the part of the head with the eyes.

  1. Boiling:

Place the octopus in a pot cover with water add some peppercorns and two cloves of garlic. Let the mixture slowly simmer. Cook until soft enough to eat. This usually takes about 1 hour but this depends on the size and perhaps on the quality of the octopus. You check the octopus piercing it with a sharp knife: if tender, the knife should go in very easily.

Remove from water and allow to cool. Refrigerate for at least 1 hour. If necessary remove flabby parts of skin and cut into big chunks or leave small octopi whole.

  1. Grilling:

Brush the octopus with olive oil and grill it over hot charcoals until you get a little bit roasted here and there. Don’t burn it!

  1. Serving:

Let cool down until desired, cut into bite size chunks and drizzle with olive oil and lemon juice. Season with salt, pepper and if like with oregano.

Arrange on a plate with cherry tomatoes or what you like (boiled potatoes would be fit as well) and serve.