Cassis (Black Currants) and Lemon Cake

One of our absolute beloved, fresh and spongy super quick cake!  

The source of this recipe is a popular recipe which we got in Spain and we adapted it reducing the oil and the sugar only for personal taste. We use Greek plain yogurt + fresh lemon instead of yogurt with lemon taste. In Spain this cake is also called “bizcocho 1 2 3 “.

We prepare if you are traveling into holidays apartments (yes, we I carried the empty tin with us) for a fast breakfast and a snack for our road trips.

For the easiest version you may use the container of your yogurt as the measure of 1 cup.

See also the Spanish version on youtube: https://www.youtube.com/watch?v=pgdaD_EJX-E&ab_channel=Elrinc%C3%B3ndelpancasero

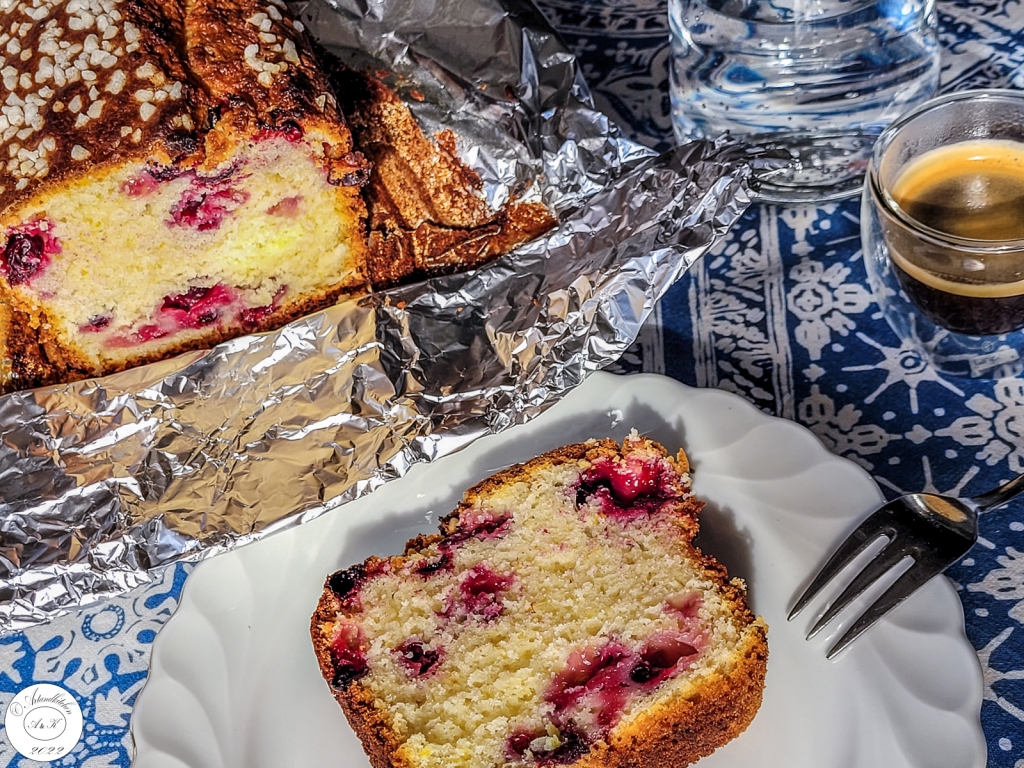
The combination of cassis and lemon gives to this cake a very strong and refreshing flavour.

We tried also these great variations:

  • Limes instead of lemons
  • Black berries, blueberries or “josta berries” instead of cassis
  • Skip the berries and convert this cake into a lemon cake

Black Currants and Lemon Cake

  • Servings: about 12
  • Difficulty: easy
  • Print

Ingredients

Batter:

  • 1 cup yogurt (any yogurt but for us Greek plain yogurt is the best)
  • ½ cup oil (original recipe: 1 cup)
  • 1 ½ cups sugar (original recipe 2 cups)
  • 3 (if you use the size of the container of the yogurt instead of “cup”) or 4 eggs (if using the official “cup”)
  • 1 lemon, zest grated
  • 1 lemon, juice
  • 3 cups flour
  • 2 teaspoons baking powder (1 envelope)
  • 1 teaspoon vanilla (1 envelope)

Fruits:

  • 1 cup black currents (cassis)  or other berries

Topping (optional)

  • Sugar pearls

Preparation:

  1. Preheat the oven to 180°C/350°F and line you mold (about 30 cm of length) with baking or aluminum foil.
  2. In a big bowl combine all the ingredients for the batter.
  3. Fold under the berries.
  4. Pour the dough into your prepared mold and add the topping.
  5. Cook for 50-60 minutes at 180°C/350°F or until done (toothpick test)
  6. Let cool down and serve.

Autor: https://artandkitchen.wordpress.com/  

White Beans with Lagoustines Stew – Habas/Alubias blancas con Langostinos

Until now I’ve not yet posted a lot of recipes with pulses. Pulses are great source of proteins and they are effectively very versatile, which allow us to combine them with many ingredients.

This inspiration comes from a dish which I got the chance to try in Galicia (Spain) last December. It was in a picturesque village called just in front of the sea and a beautiful island. The ambiance with our friends, the golden sunlight and then this delicious dish made these moments unforgettable.

No wonder I tried to replicate this and adapt the recipe to ingredients I may found at home.

The original included a local lobster kind called “bogavante”, I’m sorry I had to replace it with langoustines, but it turned very delicious with them as well.

For my version it’s very important to prepare a shellfish stock.

As shellfish are generally quite expensive, it makes sense to be using up every last part of the crustacean in order not extract the maximum of the flavour. The shells and legs (once meat has been extracted where possible) of lobsters, crabs, crayfish, langoustines and prawns impart a lot of richness taste – especially after they’re roasted. Good to know: the heads also contain precious juices. While some more old-school recipes require the whole crustacean including its meat, this is a touch more work, but it is gently way to cook the tender flesh (short cooking time) and at the same time get as much taste as possible form the shells (long cooking time). Carefully shell crustaceans and keep the meat separate from the shells to be cooked and eaten separately. Rinse any shells which may be hiding grit or sand (this is particularly important with crabs) and break down larger shells into smaller pieces. This gives them a larger surface area, which touches the bottom of the pan and caramelises, creating more flavour.

White Beans with Lagoustines Stew – Habas/Alubias blancas con Langostinos

  • Servings: 3-4 if served with a side dish as rice
  • Difficulty: medium
  • Print

Ingredients:

  • 200 g white beans
  • 300 g langoustines (in alternative king prawns)
  • Olive oil, to taste
  • 1 bay leaf
  • 1 big onion, peeled and cut into quarts
  • 200 g carrots, peeled cut in big pieces
  • 2 garlic cloves
  • 1 handful pealed roasted almonds
  • Salt, to taste
  • 1 teaspoon paprika (Pimentón dulce de la Vera)
  • 1 tablespoon tomatoes paste (optional)
  • 100 ml white wine, quantity to taste
  • Parsley, chives or green onion, chopped for serving (optional)

Preparation

  1. Soak your beans the night before: put your beans in a pot and cover them in a few centimeters of water. Forgot to soak your beans? Don’t stress out. You can also quick soak beans and get a similar effect. Just put those beans in a pot, cover them with boiling water, and cover the pot and let them sit for at least one hour in the hot water.
  2. Drain the beans them to another pot, then cover them in a few inches of water (the exact amount isn’t important). Bring them to a simmer only lightly with little for about 30 minutes.
  3. In the meantime peel and devein langoustines. Separate shells from flesh.
  4. Heat 1 tablespoon of olive oil in a non-sticky skillet and roast the shells until fragrant. Add 2 cups of water, the bay leaf and let simmer for about 20 minutes. Strain and keep the stock.
  5. Boil the onion, the carrots and 2 garlic cloves into the prepared stock for about 10 minutes. If necessary add more water. Add the almonds and blend this mixture.
  6. Drain the beans and add the broth and veggies mixture to the beans.
  7. Season with salt, paprika and add the wine.  Add tomatoes paste. Continue to simmer until the beans are just done. If necessary add more water.
  8. Chop the other 2 garlic cloves and fry them until they become fragrant. Add the langoustines or the shrimps on both sides for about 2 minutes until they get lightly roasted colour.
  9. Combine the beans stew with the shellfish and serve immediately.
  10. Optional add some parsley, chives or green onion for serving

Autor: https://artandkitchen.wordpress.com/  

Guacamole con Tomates

Guacamole is very popular Mexican dip with many variations.

This variation, which includes also the use of tomatoes, is the most appreciated in our family and every times is comes out a bit different as we do not measure the ingredients, we change it a little bit depending on what we have on hand.

This is great as appetizer with tortilla chips, but also with wraps or other dishes.

Guacamole con Tomates

  • Servings: 2
  • Difficulty: easy
  • Print

Ingredients

  • 50 g chopped onions
  • 1 avocado, ripe
  • 1 tablespoon lime juice
  • 1 tablespoon fresh cilantro, chopped
  • 1 pinch of salt, to taste
  • 1 medium tomato or about 10 cherry tomatoes, diced
  • 1 teaspoon Worcestershire sauce (optional)
  • 1 dash chili powder or other little chili sauce or some paprika powder (optional)

Procedure

  1. Place the chopped onions in a small bowl with cold water (this for about 10 minutes)
  2. In a small bowl mash the avocado with the fork
  3. Drain the onions and add them to the mashed avocado along with the other ingredients.
  4. Combine very well and season to taste

Autor: https://artandkitchen.wordpress.com/

Day 37 Stay at Home or In the Garden: Pulpo a la Mugardesa – Octopus Stew with Potatoes

Mugardos is a small fishing borough and municipality in the Comarca of Ferrol, located in the province of A Coruña in the autonomous community of Galicia, north-western Spain.

It’s here that you can find this delicious octopus stew, but now, as we are not allowed to travel, you can prepare it yourself and create a small vacation at home.

This recipe is calculated for 2 people, but you may boil more octopus and use only the quantity you need (you may also use more) and reserve the remaining for another preparation. 

Note: this recipe is perfect if you have some octopus leftovers and you wish to serve more people! I our case I doubled the quantity of potatoes for a full dinner; for this reason this is a variation of the original dish.

Pulpo alla Mugardesa - Octopus and Potatoes Stew from Galicia

  • Servings: 2-4
  • Difficulty: easy
  • Print

Ingredients

  • 300 g octopus, cleaned and well washed
  • 1 onion, chopped
  • 1 garlic clove, chopped
  • 4 tablespoons olive oil
  • 1 red pepper, diced
  • 1 green pepper (I used another red pepper as did not have the green one), diced
  • 250 g potatoes, peeled and diced (I doubled the quantity of potatoes to 500 g)
  • 1 bay leaf
  • 100 ml white wine
  • 200 ml reserved liquid from the boiled octopus
  • 1/2 teaspoon sweet paprika powder
  • Some smoked paprika (pimienton de la Vera)
  • Salt and pepper to taste

Preparation

  1. Bring a large pot of water to the boil with a pinch of salt, when the water begins to boil you need to grab the octopus from the head and ‘scare it’ by dipping it in the water 3 times and pulling it out. This makes the octopus stiffen, so the skin does not fall during the cooking process and makes the tips of the tentacles curl. Cook your octopus between 20 and 25 minutes on a medium heat. Make sure the octopus is covered with water throughout the cooking. Towards the end of the cooking process, you can check if the octopus is ready by piercing the thicker tentacles with a wooden skewer to check if they are tender enough. Octopus should be al dente, just like pasta. You should feel the same resistance as a cooked potato. Once the cooking time is complete, allow the octopus to rest in the cooking liquid before you drain it and use it for this recipe. I prefer to drain the octopus and let it cool down before slicing. Do not discard the water!
  2. Fry onion and garlic in a non-sticky skillet at low temperature until translucent.
  3. Add peppers and fry a few more minutes.
  4. At this point, add potatoes, bay leaf, and fry for other 2 minutes.
  5. Add the wine and cook for 2 more minutes.
  6. Now add the cooking water from the octopus, the paprika (as well as the smoked one if you like). Add little salt.
  7. Let simmer covered slowly until potatoes are almost done. Add some more cooking liquid form the octopus if needed. The sauce should be liquid but thick enough to bind a little bit.
  8. In the meanwhile, slice the octopus.
  9. Add octopus and adjust to taste with salt and pepper. Stir only gently and let simmer for 2 more minutes.
  10. For the best taste, keep warm (do not boil it again) for about 10 minutes before serving.

Autor: https://artandkitchen.wordpress.com/

This slideshow requires JavaScript.

Day 36 Stay at Home or In the Garden: Quick Salmorejo

Salmorejo is a fresh, thick, pink-orange soup consisting of tomatoes, bread and garlic witch is topped with hard boiled eggs and diced jamon serrano (serrano ham). A few days ago I posted the original recipe; now it’s time to post my super quick version for the days you may not have time to wait, but you wish this something fresh and tasty. In these days we try to avoid going out (Coronavirus lockout) and going shopping, we use what we have in the pantry and we adapt the recipes to the ingredients we have on hand.

Salmorejo Cordobés

  • Servings: 4
  • Difficulty: easy
  • Print

Ingredientes

  • 1 tins canned crushed tomatoes (400 g)
  • 1 cup ice cubes
  • 100 ml oilve oil
  • 1 tablespoon white balsamic vinegar
  • 3 tablespoons tomatoes paste, to taste
  • 1 garlic clove
  • 1 small white bread, diced of about 150 g
  • More water or ice cubes, as necessary
  • 10 g salt, or to taste
  • 2 eggs, hard boiled, peeled and diced
  • 100 g ham or bacon, diced
  • Olive oil to drizzle

Preaparation

  1. Place all the content of the tin in the stand mixer, add the ice cubes, the oil, the vinegar, the tomatoes paste and the garlic; pulse until smooth.
  2. Add the bread piece by piece and pulse until smooth. During this step add more water or ice cubes if necessary.
  3. Add salt and more tomatoes to taste if necessary.
  4. In a frying skillet roast the ham or the bacon to taste.
  5. Season with salt and vinegar to taste. Pulse shortly.
  6. Pour the salmorejo in bowl, top with egg and ham or bacon and drizzle a few drops of olive oil.

Autor: https://artandkitchen.wordpress.com/

Day 34 Stay at Home or In the Garden: Salmorejo Cordobés

Salmorejo is a fresh, thick, pink-orange soup consisting of tomatoes, bread and garlic witch is topped with hard boiled eggs and diced jamon serrano (serrano ham). We enjoyed this for the first time in 2014 (see photos!) in the house of our friends in Cordoba and we really loved it. For the preparation we used the light white bread witch, combined with the red of the tomatoes, gave to the dish this nice orange-pink color. The ham was already prepared diced and sold as jamon serrano for salmorejo, but you may simply dice some jamon serrano. Ana used quail eggs, but, as these are mostly not available, normal commercial eggs are suitable for this recipe.

Salmorejo Cordobés

  • Servings: 4
  • Difficulty: easy
  • Print
 

Ingredientes

  • 150 g white bread, with light colored crust (or do not use the crust)
  • Water to soften the bread (more or less 100 ml)
  • 1000 g tomatoes, ripe, washed and diced
  • 100 ml oilve oil
  • 1 garlic clove
  • 1 tablespoon white vinegar, optional
  • 10 g salt, or to taste
  • 2 eggs, hard boiled, peeled and diced
  • 100 g serrano ham, diced
  • Olive oil to drizzle

Preaparation

  1. Dice the bread and add some water to soften it. Let sit for about 10 minutes.
  2. Place tomatoes, olive oil and garlic in a food processor, pulse until very smooth and the skin of the tomatoes in not visible. If you know that you food processor is not strong enough, you should remove the skin prior dicing them.
  3. Remove excess water from the bread (simply drain it) the bread and pulse again until smooth.
  4. Season with salt and vinegar to taste. Pulse shortly.
  5. Place in the fridge to chill.
  6. Pour the salmorejo in bowl, top with egg and serrano ham and drizzle a few drops of olive oil.

Autor: https://artandkitchen.wordpress.com/

This slideshow requires JavaScript.

Day 15: Stay at Home or In the Garden: Spanish Vermouth with Oranges

Today’s travel went virtually to Spain, or better to Andalusia were a few month ago we enjoyed a wonderful week visiting amazing places and we were introduced to the trendy Spanish way to serve Vermouth.

If you are not traveling and you have to stay at home, you can prepare it yourself and enjoy it with you family with some tapas or simply olives!

There are different way to prepare it. Here some suggestions, from super simply to more sophisticated, depending on what you still have at home.

Spanish Vermouth with Oranges

  • Servings: 2
  • Difficulty: easy
  • Print

Recipe 1

  • 2 slices orange, with peel
    • 4 ice cubes
    • 200 red vermouth

Recipe 2

  • 2 slices orange, with peel
    • 4 ice cubes
    • 200 red vermouth
    • 4 drops amargo de angostura
    • 2 tablespoons orange liquor

Recipe 3

  • 4 ice cubes
    • 100 ml red vermouth
    • 50 ml gin
    • 100 ml orange juice
    • 1 orange and/or lemon peel strips

Procedure

Add to the glass following the order of the ingredients and enjoy!

Autor: https://artandkitchen.wordpress.com/

Champurrado – Mexican Hot Chocolate with Corn Flour

Atole is a Mexican corn beverage drink that is served since Aztec times during festivities. At this time the plain atole was prepared by cooking maize (corn) with water and lime until soft; then ground and cooked until thickened.

If milk is added, it is called atole de leche and if also chocolate is added, this preparation is called champurrado.

Other variation include the bark of cacao (atole de cascara), honey (atole de agua miel), red chile (atole de chile) or the native brown sugar called piloncillo (atole de pinolei).

The addition of chocolate came probably from the Mayan culture and until now in Yucatan (old Mayan territories) they serve a thick chocolate atole perfumed with honey, black pepper and allspice called tanchcua.

As you see there are many different ways to prepare this beverage, I will give you my version; however, you may adapt it to your taste!

For the decoration of the picture I used the “muñequitas” which I bought in Mexico almost 30 years ago in “San Cristobal de La Casas” (Chiapas) and which we still keep for the pleasure of our eyes and souvenirs.

Champurrado - Mexican Hot Chocolate with Corn Flour

  • Servings: 4
  • Difficulty: easy
  • Print

Credit :Artandkitchen

Ingredients

  • 2 cups whole milk
  • 1 cinnamon stick
  • 1 pod star anise, optional
  • 4 tablespoons masa harina (corn flour)
  • 2 cups water
  • 4-8 tablespoons brown sugar, to taste
  • 30 dark chocolate, grated or one tablet „Abuelita chocolate“

Directions

  1. Heat the milk and chocolate in a saucepan with the spices, stirring to dissolve the chocolate. Add sugar to the milk mixture and stir to dissolve the sugar. Remove now from heat and keep aside.
  2. Mix the masa harina with the water in a small a small saucepot stir to combine well. Heat and cook until the masa de harina is cooked and it turns translucent.
  3. Remove the cinnamon stick and the anise pod from the milk mixture and while stirring add the mixture with the with the masa de harina.
  4. Heat again (while stirring constantly) and serve the hot champurrado immediately.


Dulce de Membrillo – Quince Paste

I hope you know quinces, if not, I wish you get some and try to prepare this divine preparation which can be prepared in advance and which can be part of menu in both sweet and savory winter dishes in the coming festive days.

“Dulce de membrillo” or simply “membrillo” (Spanish name of quince paste or quince cheese) is a sweet, sticky, very thick jelly made with quinces, and is a typical dessert eaten with cheese in Spain (as the name), but it is also wonderful served for breakfast on toasted bread.

This year we got a very mild autumn and until now, the temperature did not reach the freezing point.

At the beginning of October, we collected most of the quinces, but some of them were too high for the harvest. This week the last quinces fall down, I collected them, and I knew I had to preserve them as soon as possible.

I remembered that I have already prepared quince paste, but this time I wanted to use less sugar and add more lemon flavor. I also decided to blend them only after turn reddish; it is easier for me to reduce the liquid in this way.

As membrillo contains a lot of sugar, it may be kept in the fridge for a long time. However, as I in my recipe I reduced the quantity of sugar, I suggest to keep it well wrapped in the fridge for about 2 weeks, if you want to keep it longer, I suggest to freeze it.

Dulce de Membrillo – Quince Paste

  • Servings: about 2 kg
  • Difficulty: medium
  • Print

Credit :Artandkitchen

Ingredients

  • 2000 g quinces
  • 1000 g sugar
  • 1 big lemon
  • 100 ml water

Directions

  1. Place the sugar in a heavy pot add grated lemon zest, the juice of the lemon and the water. Stir. Place the pot to very low heat.
  2. Immediately peal the first quince, remove the cored and dice them. Add the prepared quince to the sugar mix and stir. Continue to prepare the quinces add them one by one to the mixture. You will see that the quinces will release their liquid-
  3. Let this simmer slowly stirring form time to time to reduce the liquid; don’t let it stick and burn at the bottom. Most of the quinces will turn mush and after about 1 to 1½ hours, the mixture will begin to turn orange-reddish.
  4. When the liquid is mostly reduced, turn it to puree using the hand blender.
  5. Continue cooking stirring frequently with a wooden spatula, until the paste becomes very thick and has a deep orange color.
  6. There several ways to check if the paste is ready to be poured in the molds:
    • Draw the wooden spoon along the bottom of the saucepan: it should leave a trail and the quince mixture will stick to the spoon.
    • The mixture is thick enough to hold the spoon upright
    • The paste should easily come off from the sides of the pan.
    • The paste is thick enough if you are able to see the base of the pan when you draw the wooden spoon through the mixture.
  7. Scrape the paste into your prepared tin (I use simply clear foil) and level the top.  I also used  silicon molds, which worked perfectly for this. Leave to set for at least a day in a warm place, then wrap and store airtight in the fridge.

Sourdough Brioches with Orange

Our delicious oranges from Crete (the best I know!) inspired me to prepare homemade candied orange zest and since then I am using them for different recipes.

Just before Easter, I prepare my “Colomba” again (Easter Italian Dove Cake) and this week these easier version perfect for breakfast and for giveaway!

In recipe I mentioned the soft candied orange zest; I made it at home boiling the cleaned orange peels (after easting the orange first) in water, throwing away most of the liquid and adding the sugar (same weight as the zest). I’ve boiled until the water was evaporated and the zest quite dry but still soft. I spread it on a baking tray and the next day I sliced it and placed it in small jars.  In order to prevent mold, I placed the closed jars in a pot with boiling water (covering half of the height of the jars) and after simmering for at least 30 minutes, switched of the heat and waited until cooled down in the pot. This is not the conventional way to prepare the zest, but it’s easy for me and I love to have this wonderful ingredient ready to be used.

If you don’t make the candied orange zest yourself, I suggest soften it for a few hours in little hot water prior use.

We know that not everybody has his culture of sourdough, for this reason a placed the alternative directly in the ingredients!

Sourdough Brioches with Orange

  • Servings: 40 pieces
  • Difficulty: medium
  • Print

You need:

Dough:

  • 1/2 cup sourdough starter (100% hydration), alternative: 1/4 cup + 1/4 cup flour + 1 teaspoon instant yeast
  • 1 cup water
  • 1 cup flour
  • 1 orange grated zest
  • 1 teaspoon salt
  • 1/4 cup melted butter (for the dough)
  • 1/4 cup sugar
  • 1 egg, lightly beaten
  • 3 cups flour
  • 1/2 cup of soft candied orange zest (best if made at home)
  • Additional flour for rolling out
  • 6 tablespoons melted butter for brushing

Glaze

  • 3 tablespoons hot water
  • 3 tablespoons sugar for clear glaze

Procedure:

  1. Combine in a big bowl the sourdough starter, stir well, add the first cup of flour and stir well again. Cover and place in a war warm place to rise (I use the oven with only light on). The best temperature is around 26-27°C.
  2. When the mixture is foaming add the orange zest, salt, the first 1/4 cup of butter, the sugar, and the egg. Stir well. Mix together 3 cups of four with the orange zest and add them to the dough. Stir and knead until well combined. You may stir/knead with the dough spatula in the bowl or use the kneading machine. The dough should result wet but not too sticky. If necessary, add some more flour.
  3. Cover and let rise until doubled in a warm place (see above).
  4. Divide the dough into two portions. Roll out the first portion onto a floured surface to the size of about 50 to 40 cm. Brush with 3 tablespoons of melted butter and roll the dough form the longer side. Now you have cylinder about 50 cm long. Cut the cylinder into 2.5 cm slices and place each one in a prepared muffin mold (I use silicone ones so I don’t need to prepare the surface). Repeat the same with the second part of the dough.
  5. Place a heat-resistant bowl of warm water into the oven and place the molds in the oven to rise. Depending on your yeast/sourdough and the temperature, this takes 1 hour to a few hours!
  6. Let rise until they rise (I let them rise until three fold volume!) and preheat the oven to 170°C (let the bowl in the oven.
  7. For the glaze combine the hot water with the sugar and stir until the sugar almost completely melted. Gently brush the risen brioches.
  8. Bake for about 20-25 minutes until golden brown!

Autor: https://artandkitchen.wordpress.com/

This slideshow requires JavaScript.