Lasagne di Zucca – Pumpkin Lasagne

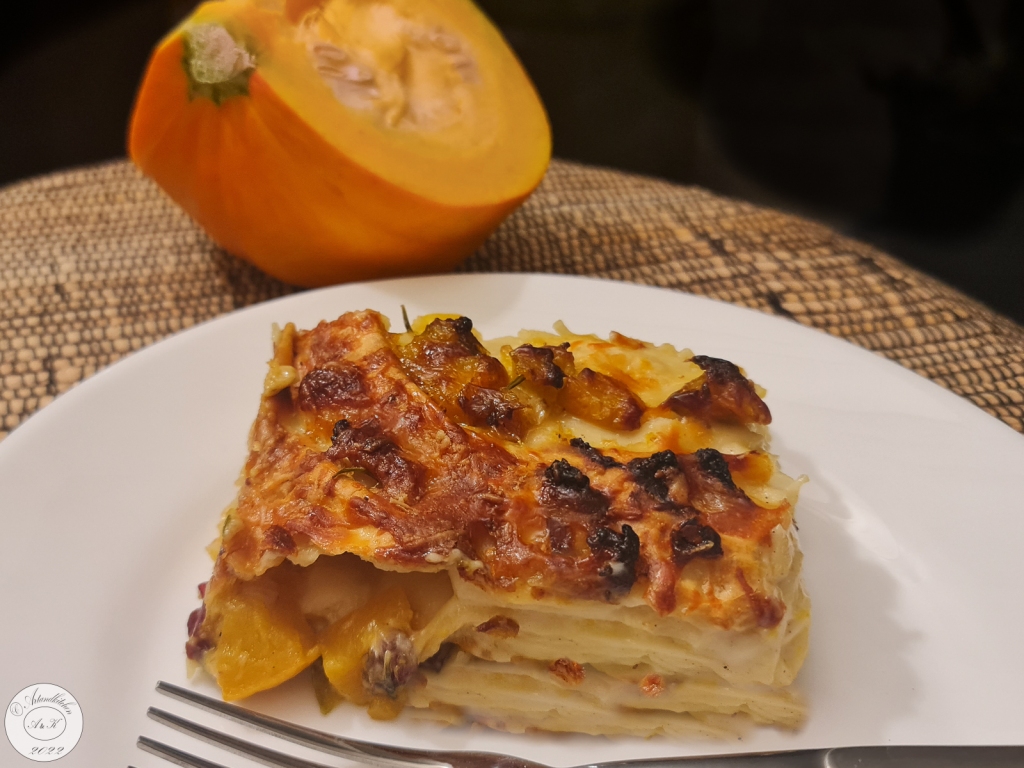
This year we will have a lot of pumpkins and I’m looking for to try some new recipes. A few days ago I made ravioli with them, yesterday lasagne. It was a great success and I will make these again for sure!

I was reading a lot of recipes about pumpkin lasagne and finally I created a new recipe, combining the ideas in different ones.

As usually I made lasagne with homemade paste simply because it taste better and with kitchen machines, this is not a big work. It’s pretty easy to make homemade lasagne sheet, with or without machines, but with a food processor with dough hook for kneading and pasta machine for rolling out we can save a lot of time.

There is really a big difference in the taste of homemade pasta and store bought, even if the latter is fresh!

In the recipe preparation I do not describe my steps for the pasta preparation, as this depends on how you are used to work and my procedure is simply “my way”.

“My way for lasagne sheets”:

First of all I prepare the dough with the kneading machine and I let this rest for about an hour. Then I knead it by hand shortly to a smooth ball. For rolling it out I take a slice of the dough, I add a lot of flour on both sides and I shape it to rectangle by hand. I roll it out with the thickest setting of the machine and I add more flour on both sides again. Now, if the dough was really well kneaded and got enough time to rest, you may roll it out to the thinnest setting. If not (it may also depends on the flour itself, maybe you have to fold the sheet and pass them though again after coating it again with flour) make and intermediate setting with a medium thickness. To save space and I time, I cut the sheet to desired size, I boil it immediately in salted water and after taking it out of the hot water I brush it with cold water shortly in order to avoid burnings, I place it directly into your baking tray for layering (I don’t precook all sheets first, I really make and boil the when I use them. I found this easier to me and space saving.

I’m used to precook the fresh lasagne sheets, but you can also skip this step and in this case the sauce needs to be a little more liquid (milk).

Lasagne di Zucca – Pumpkin Lasagne

  • Servings: 4-6
  • Difficulty: medium
  • Print

Ingredients

Dough

  • 500 g flour
  • 5 eggs
  • ½ teaspoon salt
  • 2 tablespoons olive oil

Pumpkin filling

  • 2-4 tablespoons olive oil
  • 2 onions, diced
  • 50 g dried and smoked beef or dried and smoked ham (quantity to taste), finely diced
  • 800 g pumpkin, without seeds, if needed peeled and diced to 1 cm sized pieces
  • 1 fresh spring rosemary
  • 1 fresh spring thyme (or savoury)
  • Salt and pepper to taste

Béchamel sauce

  • 800 ml milk
  • 80 g butter
  • 5 tablespoons flour
  • Salt and pepper to taste
  • Nutmeg, to taste

 Additional

  • 100 g Parmesan chess, grated
  • 100 g provolone or caciocavallo (kashkaval) cheese, diced
  • More cheese if necessary
  • Oil for coating the try
  • Butter or olive oil (optional)
  • 4 tablespoons milk (optional)

Preparation

  1. To make the pasta dough with the kneading machine (as I do): Add all the ingredients to the bowl and while working add (if necessary) little water (only a few spoon!) until the dough comes together! To kame the pasta dough by hand: combine flour and salt on the kitchen board or table, make a hole into the centre. Whisk eggs and olive oil in a small bowl and add it gradually in the centre of the flour mixture while mixing with fork or fingertips to form ball of dough. For this step start to incorporate the eggs and flour by slowly bringing more flour in from the inside edges of the well. You can use a fork or scraper for this. If necessary add a few spoons of water.  Place dough on lightly floured surface; flatten slightly. To knead dough, fold dough in half toward you and press dough away from you with heels of hands. Give dough a quarter turn and continue folding, pushing, and turning. Continue kneading 5 minutes or until smooth and elastic, adding more flour to prevent sticking if necessary.
  2. Roll the dough into a ball and wrap it in cling film and let it sit for about 30 minutes, best if 1 hour. In the meantime prepare the fillings.
  3. Make the pumpkin layer: in a wide skillet, brown onions with dried meat. Add diced pumpkin, herbs salt and pepper to taste. Cook covered but stirring from time to time until just tender. Remove herbs spring and set aside
  4. Make the béchamel sauce: Warm the milk in a separate saucepan or in the microwave until warm to the touch and set aside. (Take care to have this ready). Melt the butter in a pot over medium heat, add the flour and roast (while stirring constantly) the flour until you see that it begins to change the colour. Reduce the heat to minimum. Add the milk at once (this is very important) and stir immediately in order to avoid clumps. Whisk vigorously until smooth! Cook while stirring until thickened. Switch off the heat. Now can add salt, pepper and nutmeg, adjust quantity to taste
  5. Make sure you have both kind of cheese ready.
  6. Rework the pasta dough: Unwrap dough and knead briefly on lightly floured surface folding the dough in half toward you and press dough away from you with heels of hands (repeat 3-4 times, it should not be sticky (if necessary repeat adding more flour on the working surface). Set aside.
  7. To make pasta sheets: Cut a slice of dough (cover the rest with the film), add flour on both sides and pass it though the pasta (widest thickens), add more flour again on both sides and pass it through again with a thinner setting, repeat until desired thickness. If you do not use a pasta machine, roll out the slice by Boil it immediately in salted water with addition of some oil (and use them directly for layering) or transfer the ready sheets to a drying rack or floured towels until you have all done.
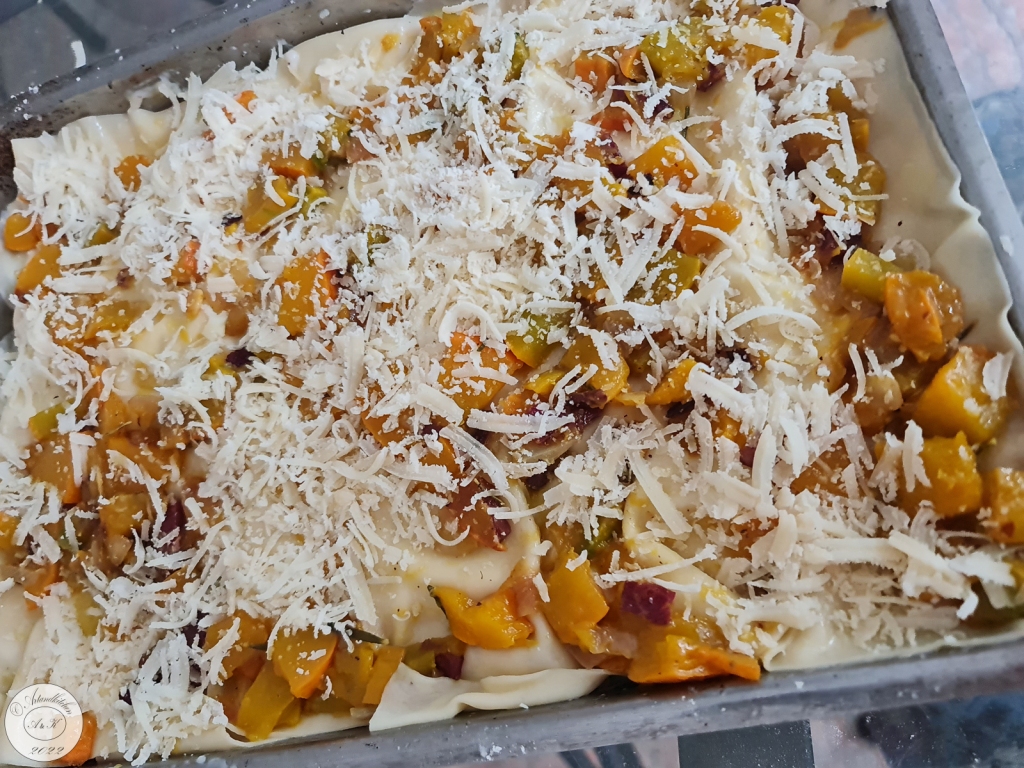
  8. Assembling: First of all I add 1 tablespoon olive oil just to coat the tray and I spread about 2 tablespoons of béchamel sauce. Lay one layer pasta sheets (precooked or not). Then follow: béchamel, pasta sheets, pumpkin mix, both kind of cheese, pasta sheets, béchamel, pasta, pumpkin mix, cheese, pasta, pumpkin mix cheese…  Take care to adjust quantities while working, grating more cheese if necessary and to finish with a pumpkin and cheese layer. Some people love to add some butter, olive oil and or milk to the top layer.
  9. Bake at 150°C for about 30 minutes. Then increase temperature to 180°C and bake until a golden brown crust is formed.
  10. For easier cutting let cool down 15 before cutting. Enjoy!

Autor: https://artandkitchen.wordpress.com/  

Chickpea Croquettes with Parmesan Cheese and Almonds

Today I would like to present you a very tasty recipe of chickpeas cakes enriched with Parmesan cheese, almonds and spices.

They are very easy to be prepared and only a few ingredients are needed.

With a rich salad and if you maybe a yogurt sauce they can make a great full but still light meal.

You may adapt the recipe to you taste for example with some herbs, with garlic or roasted onions or other spices. Enjoy!

You may also make bigger ones and make of them burgers.

Chickpea Croquettes with Parmesan Cheese and Almonds

  • Servings: 4-6
  • Difficulty: medium
  • Print

Ingredients

  • 400 g chickpeas, precooked and drained
  • 80 g Parmesan cheese, grated
  • 80 g almonds, grinded
  • 1 egg
  • ½ teaspoon coriander ground, quantity to taste (or other spices or herbs to taste)
  • Salt and pepper to taste
  • More or less 100 g grinded almonds for coating
  • Oil for frying (I used olive oil)

Preparation

  1. Drain well your chickpeas and blend them until smooth
  2. Add cheese, almonds, egg, spices and salt and pepper. Combine well working this with a fork or a spoon. Adjust spices, salt and pepper to taste. If the mixture results to wet, add some more grinded almonds.
  3. Scoop some mixture, form to ball with your hands, make the little flat and coat them in the additional grinded almonds. Place on a plate until you will have all them ready.
  4. In a non-sticky skillet heat little oil. Place the croquettes to fry gently. Brush or drizzle the upper side with oil. Turn when they begins to brown and cook on the other side until golden. Do not overcook them as they are delicious especially if moist.
  5. Serve them preferably warm.

Autor: https://artandkitchen.wordpress.com/  

Preserved Tomatoes with Basil in Jars

Do want to keep the taste of the summer for the winter?

This is a simple but easy way to preserve the full flavour of your tomatoes and at the same time to have quick ready dish when you feel you are missing the sun and your fresh tomatoes from the garden.

This year we got a wonderful tomatoes harvest and we are still harvesting every day. We exchanged seed with friends and so we got an incredible variety of tomatoes and other vegetables. Now the winter is approaching, we all have to save electricity and with this method you will prepare great pasta dishes without spending a lot of time in cooking your tomatoes sauce.

Important! For sterilization with a pressure canner, please follow the instruction for the equipment. Depending on the Country you live, you will find completely different safety instruction about canning and possible botulinum poisoning.

Processing time for canning articles:

Preserved Tomatoes with Basil in Jars

  • Difficulty: medium
  • Print

Ingredients

natural-preserved-tomatoes-with-basil-6 All quantity to taste and according to your harvest J
  • Ripe tomatoes
  • Olive oil (about 4 tablespoons per kg tomatoes)
  • Garlic, chopped to taste
  • Balsamic vinegar (4 tablespoons per kg tomatoes), this is needed for longer storage
  • Salt (about 1 teaspoon per kg tomatoes)
  • Basil leaves or flowers to taste

Preparation

  1. Clean and dice tomatoes according to their size. I did not dice wild tomatoes, I halved cherry tomatoes and the other tomatoes in 1- 1.5 cm big sizes.
  2. Heat oil and add the garlic. Roast only a few minutes until fragrant.
  3. Remove garlic-oil mixture and pour it over the prepared tomatoes. Add vinegar and little salt.
  4. Combine gently and let sit for about 2 hours. They will release some juices.
  5. Add basil and stir well.
  6. Place the tomatoes mixture into the jars. Fill jars, leaving 2 cm headspace. Press gently down the tomatoes in order to cover the pieces with their juices.. Slide a nonmetallic spatula (a plastic knife works well) around the inside edge of the jar, pressing back gently on tomatoes to release any air bubbles. Do not add water.
  7. Use a clean, damp cloth to wipe any tomato residue from the outer rim of the jar. This is necessary in order seal tight the jars. Screw lid evenly and firmly, but not too tight; just until resistance is met and lids are fingertip tight.
  8. I performed the “heat treatment” of the canned tomatoes in water bath. Place the jars into big pot (or use a canner). Fill with warm water. The water must cover the jars by 2 cm. Bring to a rolling boil, cover the pot and boil for 60 minutes if using 250-500 ml jars. Let cool down completely before removing the jars from the pot. Check if the lid is tightly closed after cooling down.  For heat treatment, please follow the instruction of your equipment (for example the pressure canner) and the following link: https://extension.umn.edu/preserving-and-preparing/canning-quick-reference-chart.
Suggestion: place the jar in water bath or shortly in microwave and serve over hot pasta with fresh grated Parmesan cheese and fresh basil Autor: https://artandkitchen.wordpress.com/

This slideshow requires JavaScript.

Coral and Jade Prawns

This was one of the first Chines recipes we found in a cookbook (Kare Jup Ha Kow) and prepared as we started to travel around Asia and missing the Asian taste once back at home.

With the time we adapted the recipe to our taste but we kept the to the combination of prawns, broccoli and baby ginger; the last one the big hit in this dish!

This need a bit of time for the preparation of the broccoli florets and assembling with the prawn, but it looks so pretty that we never skipped this step.

Coral and Jade Prawns

  • Servings: 2-3 persons if served alone with rice
  • Difficulty: easy
  • Print

Ingredients

  • 400-500 g prawns
  • 1 broccoli head
  • 2 tablespoons vegetal oil
  • 2 tablespoon finely diced ginger
  • 2 garlic cloves, finely chopped
  • ½ cup of water
  • 2 teaspoons cornstarch
  • 1 tablespoon Chinese rice wine or dry sherry
  • 1 tablespoon soya sauce, to taste
  • 1 tablespoons sliced preserved pink baby ginger

Preparation

  1. Shell and devein the shrimp letting the last part of the tail as it is.
  2. Wash the broccoli and with a knife prepare as many florets as the prawns. Make a point at the end of the green stalk.
  3. Make an incision on the tail of the prawn and pass the end of the broccoli stem though this hole.
  4. In a small bowl combine water with cornstarch.  Set aside.
  5. Heat the oil in a wide non-stick frying skillet. Add garlic, and ginger and stir fry until fragrant.
  6. Add the prawn with the broccoli to the skillet and fry for about 2 minutes. Turn gently and cook for one more minute,
  7. Add soya and rice wine, reduce the heat to minimum.
  8. Add the mixture of water and cornstarch cover, shake gently the skillet, and cook for two minutes or until broccoli begins to turn a bit soft. Add more water or soya sauce to taste if needed.
  9. Just before serving top with the baby ginger.
  10. Serve immediately with rice.

Autor: https://artandkitchen.wordpress.com/  

Xortopita – Greek Greens Pie

Wild greens constitute one of the greatest capital of Cretan cuisine. No one knows exactly how many different species of plants are used for human consumption and helped these people to survive during wars and occupation times.  I read that more than 120 herbs from the coastal zones to the higher mountain regions have been identified and counted.

Picking wild greens is a very enjoyable activity and the prepared meals are super healthy food!

For this recipe I used self-seeded Swiss chard form last year who is sprouting here and there in my vegetable garden. A great gift form the nature.

For the “Cretan” flavourful taste, I added mint and dill and some feta.

Usually these greens pies are prepared in the oven and the dough used for this is the filo.

One of the specialties of Sfakia are the “Sfakianopites”:  round flat pies filled with local mizithra cheese, pan-fried (without oil or butter) and then, served with a generous drizzle of Cretan honey.

For this pies I used the technique of the sfakianopites and worked very well.

For the dough I used my sourdough recipe which, thanks to the long ferment time, turns very elastic for rolling it out. https://artandkitchen.wordpress.com/2018/05/07/basic-bread-recipe/

For the yogurt sauce see: https://artandkitchen.wordpress.com/2013/02/18/mint-and-dill-yogurt-sauce/

Xortopita - Greek Greens Pie

  • Servings: 6
  • Difficulty: medium
  • Print

Ingredients:

Dough

  • ½ cup sourdough starter (or ¼ cup water + ¼cup flour + 1/4 teaspoon dry yeast)
  • 1 cup water
  • 3 cups flour
  • 1 tablespoon salt

Filling

  • 300 greens (I used the green part of Swiss chards)
  • 2 tablespoons olive oil
  • 1 medium onion, finely chopped
  • 3 spring onions, finely chopped, tender green part as well
  • 3 tablespoons cup finely chopped fresh spearmint
  • 2 tablespoons finely chopped dill
  • 200 g crumbled feta
  • Salt and pepper to taste

Prodecure:

  1. Combine the sourdough starter with the water and the first cup of flour for the first rising into a big bowl, cover and let sit until spongy. The time depends of the kind of yeast (if using sourdough starter often I combine them the evening before or early in the morning) and the temperature.
  2. Add the the other two cups of flour and the salt for the second rising knead shortly and let lit for about 20 minutes. Now knead again until smooth. I perform this step directly in the bowl using a dough spatula and folding over the bread until done. Let rise a few hour until doubled. During this time prepare the filling.
  3. Wash the greens and drain very well. Then slice them.
  4. Heat the oil and fry the onion until translucent. Add the greens and cook stirring from time to time until the liquid is almost adsorbed.
  5. Add the herbs and combine well.
  6. Add the feta and season to taste with salt and pepper. Place on in a bowl to cool down.
  7. When the dough is soft, divide it into 6 pieces. Make 6 portions of filling. Note: you may make also more pieces/portions and make smaller pitas.
  8. Roll out the dough to the size of about 15 cm on a well-floured surface. Place the filling on it and carefully close the filling into the dough trying to exclude as much air as possible.
  9. Dust well with flour and slowly roll this out to the desired size. I made round of about 25 cm. Do not staple them, but place them on a well-floured surface until cooking time.  Best if you would in team and somebody helps you the roast the pitas while you roll them out.
  10. Heat a skillet and roast dry on both sides until browned. Note: We decided to cook them on the open fire.
  11. Serve if warm with yogurt sauce.
  12. Leftovers may be kept in the fried for a few day or be frozen.

Autor: https://artandkitchen.wordpress.com/

Guacamole con Tomates

Guacamole is very popular Mexican dip with many variations.

This variation, which includes also the use of tomatoes, is the most appreciated in our family and every times is comes out a bit different as we do not measure the ingredients, we change it a little bit depending on what we have on hand.

This is great as appetizer with tortilla chips, but also with wraps or other dishes.

Guacamole con Tomates

  • Servings: 2
  • Difficulty: easy
  • Print

Ingredients

  • 50 g chopped onions
  • 1 avocado, ripe
  • 1 tablespoon lime juice
  • 1 tablespoon fresh cilantro, chopped
  • 1 pinch of salt, to taste
  • 1 medium tomato or about 10 cherry tomatoes, diced
  • 1 teaspoon Worcestershire sauce (optional)
  • 1 dash chili powder or other little chili sauce or some paprika powder (optional)

Procedure

  1. Place the chopped onions in a small bowl with cold water (this for about 10 minutes)
  2. In a small bowl mash the avocado with the fork
  3. Drain the onions and add them to the mashed avocado along with the other ingredients.
  4. Combine very well and season to taste

Autor: https://artandkitchen.wordpress.com/

Roasted Figs with Camembert Cheese and Honey

Camembert Cheese Figs trees are native in the Middle East and western Asia and had been cultivated since ancient times. Today they are widely grown throughout the world, both for its fruit and as an ornamental plant. Two crops of figs can be produced each year. The first or breba crop develops in the spring on last year’s shoot growth. The main fig crop develops on the current year’s shoot growth and ripens in summer (August in Southern Europe) or autumn (September to October in Central Europe). The main crop is generally superior in quantity and quality, but some cultivars produce good breba crops. There are three types of edible figs: some of them need pollination by the fig wasp with pollen for fruiting and some not. In Central Europe where this wasp is not present, the cultivation of figs is possible. This year we had a many figs during summertime (breba crops) and in addition, after the warm September, we are getting many figs again and we are enjoying them. I would like to present you this simple but very impressive recipe, which is perfect for a starter or appetizer.

Roasted Figs with Camembert Cheese and Honey

  • Servings: 8 figs
  • Difficulty: easy
  • Print

Ingredients:

  • 8 Figs, washed
  • 100 g Camembert cheese or Brie cheese, diced
  • Nutmeg, quantity to taste
  • Salt, only a very small pinch for each fig (I used my basil flower salt)
  • blanched sliced or slivered almonds (alternatively chopped walnuts)
  • 4 teaspoons honey, quantity to taste
  • Fresh savoury or thyme (alternatively dried thyme)

Procedure:

  1. Remove the stem of the figs and simply slice into the figs as if you were quartering them but do not go all the way down. You want the figs to open out like a flower but not fall apart completely.
  2. Distribute the cheese into the center of the figs
  3. Sprinkle little nutmeg and salt on them
  4. Adjust the almonds over the cheese
  5. Bake them in the preheated oven at 200°C/400°F or until the almonds are lightly roasted and the cheese begins to melt.
  6. Arrange the figs on serving dishes spoon the honey over them and add the herbs.
  7. Serve if possible immediately
Autor: https://artandkitchen.wordpress.com/

Quince and Potato Cheesy Gratin

Apples and grapes are already places in the storage room or converted in juice. Now it’s the turn for the our beloved quinces; this year we have really a lot of them and I’m looking for to try as much as possible different recipes. We all love sweets and cakes, but as quinces are very versatile, I hope we will travel virtually around the world and bring something new in our kitchen.

This recipe was inspired on an apple and bread ramequin. It is an autumn recipe for and comfort fully satisfying meal; you may serve this for Thanksgiving as well! 

Quince and Potato Cheesy Gratin

  • Servings: 4-6
  • Difficulty: easy
  • Print

Ingredients:

  • 1000 g quinces, cored and sliced (about 5 mm thin)
  • 1000 g baking potatoes, peeled and sliced (about 5 mm thin)
  • 100 g mozzarella cheese, sliced
  • 150-200 g Swiss Cheese as for example Gruyere, sliced
  • 2 eggs
  • 250 ml milk
  • 100 ml heavy cream
  • 1 tablespoon flour
  • ½-1 tablespoon fresh rosemary chopped (or 1 teaspoon dried)
  • ½ tablespoon fresh savory chopped (or fresh thyme or ½ teaspoon dried)
  • ¼ teaspoon nutmeg powder
  • Salt (about 1 teaspoon) and pepper to taste

Procedure:

  1. Preheat the oven to 180°C/350°F.
  2. Layer quinces and potatoes diagonally in a baking dish.
  3. Place mozzarella and Swiss cheese between the slices.
  4. In a bowl combine all the other ingredients and whisk until smooth.
  5. Pour the mixture equally over the ingredients in the baking dish.
  6. Bake for about 1 hour at 180°C/350°F until the potatoes are soft. If necessary during the cooking time cover with a parchment foil or lid in the case the surface turns to dark.

Variations & Ideas:

  • Instead quinces use apples or pears
  • Instead of potatoes use stale bread or sweet potatoes
  • Replace mozzarella and Swiss cheese with any grated melting cheese
  • Instead of milk, heavy cream, eggs and flour use 500 ml of béchamel sauce
  • Experiment with different spices
  • Cut slices of leftover gratin and fry on all sides for a crispy way to give it new life

    Autor: https://artandkitchen.wordpress.com/

Speckgugelhopf with Walnuts – (Sourdough Version)

Traditionally bakers make this rich Alsatian (southern part of France near the Swiss border) bread in hand-painted earthenware molds, but steel, non-stick-metal or glass molds are fine too. The size of the mold corresponds to about 2 liter. This soft savory Gugelhopf (or Kugelhopf or Gugelhups) is perfect to be served (if possible lukewarm) as appetizer with some wine and it goes always very quickly.

Variations:

  • substitute walnuts with pecan or almonds
  • add chopped rosemary or thyme
  • substitute bacon by diced cheese
  • add fried onion rings
  • substitute pork bacon by dried smoked beef or turkey bacon

Speckgugelhopf with Walnuts - (Sourdough Version)

  • Servings: 12
  • Difficulty: medium
  • Print

Ingredients

Activated starter

  • 100 g sourdough starter
  • 100 g water
  • 100 g flour

Dough

  • 175 ml milk
  • 350 g flour
  • 2 teaspoons salt
  • 150 g butter or margarine, melted
  • 1 egg

Additions for the taste

  • 200 g country bacon whole, skin removed
  • 1/2 cup walnuts (pecans works well as well), coarsely chopped

Procedure

  1. For this recipe, you have to activate the starter combining the sourdough starter you kept in the fridge with the same amount of each water and flour (each 100 g). Best do it the evening before and loosely cover in a bowl; it should be ready after about 10-12 hours at room temperature. At this time starter should be very active and spongy.

Note: his is left to mature (ferment) until ready to be used to mix into a dough.

  1. Now it’s time to add the ingredients for the dough. Add the milk, the 350 flour, the salt, the butter and the egg.
  2. Knead with the hock until it looks smooth and it begins to loosen from the walls. Cover and let rise until it doubles the volume. Depending on the kind of your culture, this can take 4-8 hours.
  3. Dice the bacon into 5-8 mm cubes and roast in in a pan. If it loos to much fat, drain it.
  4. Bring bacon and nuts into the risen dough it over several times. I don’t knead it in order to keep the dough as soft as possible.
  5. Make a hole into the center of the dough and place it in the prepared tin (please butter it before; you may also use the fat of the bacon).
  6. Cover and let rise in a warm place until it at least doubles the volume. This may take about 2-3 hours.
  7. Bake for approximately 45-50 minutes in the lower half of an oven preheated to 200°C. If notice that during the baking time the surfaces begins to turn to dark, cover loosely with aluminum foil.
  8. Wait a few minutes before unmolding and serve it possible lukewarm.

Autor: https://artandkitchen.wordpress.com/

This slideshow requires JavaScript.

Day 40 Stay at Home or In the Garden: Vegetable Tart with Seeds

Parwin suggested this versatile recipe for a “Stay at Home recipe exchange” game. This came out so delicious, that I thought it would be a good idea to share this for our friends.

As the recipe does not specify the ingredients, your are really free to use what you have on hand and make a delicious meal for you family.

Below I will give you the recipe and here my choices.

  • Dough: home made with sourdough
  • Pesto: red and green pesto Genovese
  • Vegetables: red peppers and defrosted green tomatoes form the garden (picked in fall as we removed the plants form the vegetable garden), sliced red onion
  • Seeds: pine nuts, pumpkin, chopped roasted pistachio
  • Herbs: parsley, basil and oregano
  • Salt: Basil salt

Vegetable Tart with Seeds

  • Servings: 4
  • Difficulty: easy
  • Print

Ingredients

  • Dough: readymade or self-made (any kind, but not sweet)
  • Pesto (any kind)
  • Vegetables, sliced or in small pieces, fresh or defrosted
  • Seeds as pumpkin, sesame, almonds, pine nuts (any kid)
  • Fresh herbs as parsley, oregano, thyme or basil
  • Salt and pepper, to taste

Procedure

  1. Place the dough on you baking try.
  2. Spread the pesto over the dough.
  3. Add vegetables.
  4. Top with seed.
  5. Adjust salt and pepper to taste.
  6. Bake about 25 min at 180°C or as needed (time depends on the dough and the toppings); you may also bake it at higher temperatures, but simply check when the bottom is ready
  7. Remove from the oven and serve with fresh herbs.
  8. Place salt and pepper on the table.

  https://artandkitchen.wordpress.com/