Rhubarb Tarte-Tatin

This month we got a lot of rain! Too much! Nevertheless my rhubarb seems to like it and it is growing like a weed.

The best way to keep it under control and make my family happy is to bake something with it! 

In the past years I made different cakes with rhubarb, but as usually I wish to try something different and see how it comes out!

This recipe is super simple, not so many ingredients are needed, it is quick done and it looks fabulous!

Serve this fresh cake best with roasted pistachios or almonds.

Rhubarb Tarte-Tatin

  • Servings: 8
  • Difficulty: easy
  • Print

Ingredients

Base:

  • 15 g butter, melted
  • 100 g sugar
  • 500 g Rhubarb, cleaned cut into 3-5 cm pieces (or as you like)

Batter:

  • 50 g butter, softened
  • 150 g Greek yogurt
  • 100 g sugar
  • 1 teaspoon vanilla sugar
  • 2 Eier
  • 225 g flour
  • 1 teaspoon baking powder

Topping:

  • 2 tablespoons chopped roasted pistachios (alternative: almonds)

Procedure

  1. Preheat the oven to 200°C/400°F.
  2. Cover the bottom of a Springform with baking paper.
  3. For the base: Brush with the melted butter and sprinkle with the sugar. Arrange Rhubarb on it.
  4. In a bowl, whisk together the butter, the yogurt, the sugar and the vanilla sugar. Add the eggs and whisk until well combined.
  5. In another bowl, sift together flour and baking powder.
  6. Add the dry mix to the wet mix and incorporate well with a spatula.
  7. Spoon the batter over the arranged rhubarb and smooth well with a spatula.
  8. Bake at 200°C/400°F for about 30-35 minute or until risen, golden brown and a skewer inserted into the middle of the cake comes out clean.
  9. Remove from the oven and let sit for about 5 minutes. Run a knife around the edges and carefully remove the border of the Springform and let cool down completely on a grid.
  10. Invert on a serving plate, remove the bottom of the Springform and carefully the baking paper.
  11. Serving suggestion: garnish with chopped roasted pistachios.

Autor: https://artandkitchen.wordpress.com/

Roasted Figs with Camembert Cheese and Honey

Camembert Cheese Figs trees are native in the Middle East and western Asia and had been cultivated since ancient times. Today they are widely grown throughout the world, both for its fruit and as an ornamental plant. Two crops of figs can be produced each year. The first or breba crop develops in the spring on last year’s shoot growth. The main fig crop develops on the current year’s shoot growth and ripens in summer (August in Southern Europe) or autumn (September to October in Central Europe). The main crop is generally superior in quantity and quality, but some cultivars produce good breba crops. There are three types of edible figs: some of them need pollination by the fig wasp with pollen for fruiting and some not. In Central Europe where this wasp is not present, the cultivation of figs is possible. This year we had a many figs during summertime (breba crops) and in addition, after the warm September, we are getting many figs again and we are enjoying them. I would like to present you this simple but very impressive recipe, which is perfect for a starter or appetizer.

Roasted Figs with Camembert Cheese and Honey

  • Servings: 8 figs
  • Difficulty: easy
  • Print

Ingredients:

  • 8 Figs, washed
  • 100 g Camembert cheese or Brie cheese, diced
  • Nutmeg, quantity to taste
  • Salt, only a very small pinch for each fig (I used my basil flower salt)
  • blanched sliced or slivered almonds (alternatively chopped walnuts)
  • 4 teaspoons honey, quantity to taste
  • Fresh savoury or thyme (alternatively dried thyme)

Procedure:

  1. Remove the stem of the figs and simply slice into the figs as if you were quartering them but do not go all the way down. You want the figs to open out like a flower but not fall apart completely.
  2. Distribute the cheese into the center of the figs
  3. Sprinkle little nutmeg and salt on them
  4. Adjust the almonds over the cheese
  5. Bake them in the preheated oven at 200°C/400°F or until the almonds are lightly roasted and the cheese begins to melt.
  6. Arrange the figs on serving dishes spoon the honey over them and add the herbs.
  7. Serve if possible immediately
Autor: https://artandkitchen.wordpress.com/

Speckgugelhopf with Walnuts – (Sourdough Version)

Traditionally bakers make this rich Alsatian (southern part of France near the Swiss border) bread in hand-painted earthenware molds, but steel, non-stick-metal or glass molds are fine too. The size of the mold corresponds to about 2 liter. This soft savory Gugelhopf (or Kugelhopf or Gugelhups) is perfect to be served (if possible lukewarm) as appetizer with some wine and it goes always very quickly.

Variations:

  • substitute walnuts with pecan or almonds
  • add chopped rosemary or thyme
  • substitute bacon by diced cheese
  • add fried onion rings
  • substitute pork bacon by dried smoked beef or turkey bacon

Speckgugelhopf with Walnuts - (Sourdough Version)

  • Servings: 12
  • Difficulty: medium
  • Print

Ingredients

Activated starter

  • 100 g sourdough starter
  • 100 g water
  • 100 g flour

Dough

  • 175 ml milk
  • 350 g flour
  • 2 teaspoons salt
  • 150 g butter or margarine, melted
  • 1 egg

Additions for the taste

  • 200 g country bacon whole, skin removed
  • 1/2 cup walnuts (pecans works well as well), coarsely chopped

Procedure

  1. For this recipe, you have to activate the starter combining the sourdough starter you kept in the fridge with the same amount of each water and flour (each 100 g). Best do it the evening before and loosely cover in a bowl; it should be ready after about 10-12 hours at room temperature. At this time starter should be very active and spongy.

Note: his is left to mature (ferment) until ready to be used to mix into a dough.

  1. Now it’s time to add the ingredients for the dough. Add the milk, the 350 flour, the salt, the butter and the egg.
  2. Knead with the hock until it looks smooth and it begins to loosen from the walls. Cover and let rise until it doubles the volume. Depending on the kind of your culture, this can take 4-8 hours.
  3. Dice the bacon into 5-8 mm cubes and roast in in a pan. If it loos to much fat, drain it.
  4. Bring bacon and nuts into the risen dough it over several times. I don’t knead it in order to keep the dough as soft as possible.
  5. Make a hole into the center of the dough and place it in the prepared tin (please butter it before; you may also use the fat of the bacon).
  6. Cover and let rise in a warm place until it at least doubles the volume. This may take about 2-3 hours.
  7. Bake for approximately 45-50 minutes in the lower half of an oven preheated to 200°C. If notice that during the baking time the surfaces begins to turn to dark, cover loosely with aluminum foil.
  8. Wait a few minutes before unmolding and serve it possible lukewarm.

Autor: https://artandkitchen.wordpress.com/

This slideshow requires JavaScript.

Almost only Apples Cake


This is he cake I was looking for, as I needed a cake, which include a lot of apples and as less as possible flour and fats! It is not my creation I found it on Eryn’s blog (http://erynfollecuisine.canalblog.com/archives/2008/02/06/7847617.html) and I adapted it to my ingredients.

The result is awesome: juicy, tender, fresh and melting in the mouth!

This recipe could be regarded as basic recipe (my recipe is already a variation on the Eryn’s one); you may add cinnamon, cardamom, grated lemon peel, nutmeg, brandy, amaretto or what you wish! Have fun and enjoy this delicious healthy cake.

In the original recipe it was suggested to add 100 mL water, but I omitted this as I wanted to be sure that the cake would set enough.

Almost only Apples Cake

  • Servings: 8
  • Difficulty: easy
  • Print

Ingredients

  • 6 apples (alternative 4 apples and 2 pears)
  • 70 g flour
  • 1 teaspoon baking powder
  • 2 teaspoons vanilla sugar
  • 1 pinch of salt
  • 2 eggs
  • 70 g sugar
  • 20 g melted butter
  • Powdered sugar to dust

Prcedure

  1. Preheat the oven at 200°C.
  2. Butter and dust with flour a 24 cm (about 9 inch) round mold.
  3. Peel apples (and pears if used) and place them in a bowl with water (I add some salt in order to prevent oxidation).
  4. Combine in a bow: flour, baking powder (sifted), vanilla sugar and salt.
  5. In another bowl beat egg and sugar until foamy and very soft. Add the butter and mix shortly.
  6. Fold the flour mix under the egg mix.
  7. If you used also pears, divide the batter into both bowls: 1/3 for the pears and 2/3 for the apples-
  8. Remove the core of the fruit and slice them into very thin slices.
  9. Place the apples (and the pears if used) in the corresponding bowl of batter and stir to coat them well.
  10. Place the apple mixture in the prepared mold and level them with a spatula. If you used also the pears, layer the batter with the pears over the apple layer, level again with the spatula.
  11. Bake in the preheated oven at 200°C for about 40 minutes until golden and set.
  12. Let cool partially and dust with powdered sugar.
  13. Serve lukewarm and cold.

Autor: https://artandkitchen.wordpress.com/

Asparagus Gratin

asparagus-gratin2

This is a wonderful way to prepare asparagus which you can use as main or as side dish.

Originally I prepared the sauce/topping for potatoes gratin (modified from mini potato gratins by ImPat), but I found that this would be perfect for asparagus as well. I let to you open the possibility to use potatoes and asparagus at the same time, this would save you a lot of time in the kitchen. The sauce is a variation of a béchamel sauce, but it much richer in taste and cheesy.

In any case this is much lighter than other mayo-asparagus recipes or asparagus with Béarnaise sauce and I really love this much more in this was.

Suggestion 1: you can make this lighter replacing part of the butter by olive oil, using light milk and light cheese.

Suggestion 2: instead simply milk you can use 150 ml milk + 50 ml white wine or you can add some brandy.

Asparagus Gratin

  • Servings: 2-3
  • Difficulty: easy
  • Print

Autor: https://artandkitchen.wordpress.com/ asparagus-gratin2

You need:

  • 500 g green asparagus, peeled and trimmed stem
  • 50 grams butter
  • 1 small onion, chopped
  • 2 garlic cloves, chopped
  • 2 tablespoons flour
  • 200 ml milk, if possible warmed (for example with microwave)
  • 1 tablespoon Dijon mustard, best if coarse grain
  • 3 tablespoons fresh savory, chopped (or 1 teaspoon dry thyme leaves) or other herbs to taste
  • 2 green onions, finely chopped
  • Salt and pepper to taste
  • 1/2-1 cup grated cheese, quantity and quality to taste

Procedure:

  1. Preheat the oven to 220°C/430°F.
  2. Place asparagus in a big skillet, add one cup of water and boil until they begin to turn tender. Depending on the quality they take 3-10 minutes. Drain, place in a greased baking dish and set aside; keep warm.
  3. In the meantime fry the onion in the butter until translucent, add garlic and fry for one more minute.
  4. Add flour and stir well until combined.
  5. Remove from heat, add milk and whisk until well combined and flour is dissolved. Return to the heat and cook until it thickens. Remove from heat.
  6. Add mustard, savory and spring onion, adjust with salt and pepper to taste.
  7. Pour sauce over the asparagus, top with cheese and place immediately in the oven
  8. Bake until golden; this takes about 10-15 minutes

asparagus-gratin1

Spring Celebration Salad

Spring-Celebration-Salad-2

Celebrate spring going out and collecting edible flower, herbs and arranging them to prepare a salad!

I love wild food and I prepare often wonderful dishes with this, but recommend you to use ONLY what you know and you are sure it’s edible!

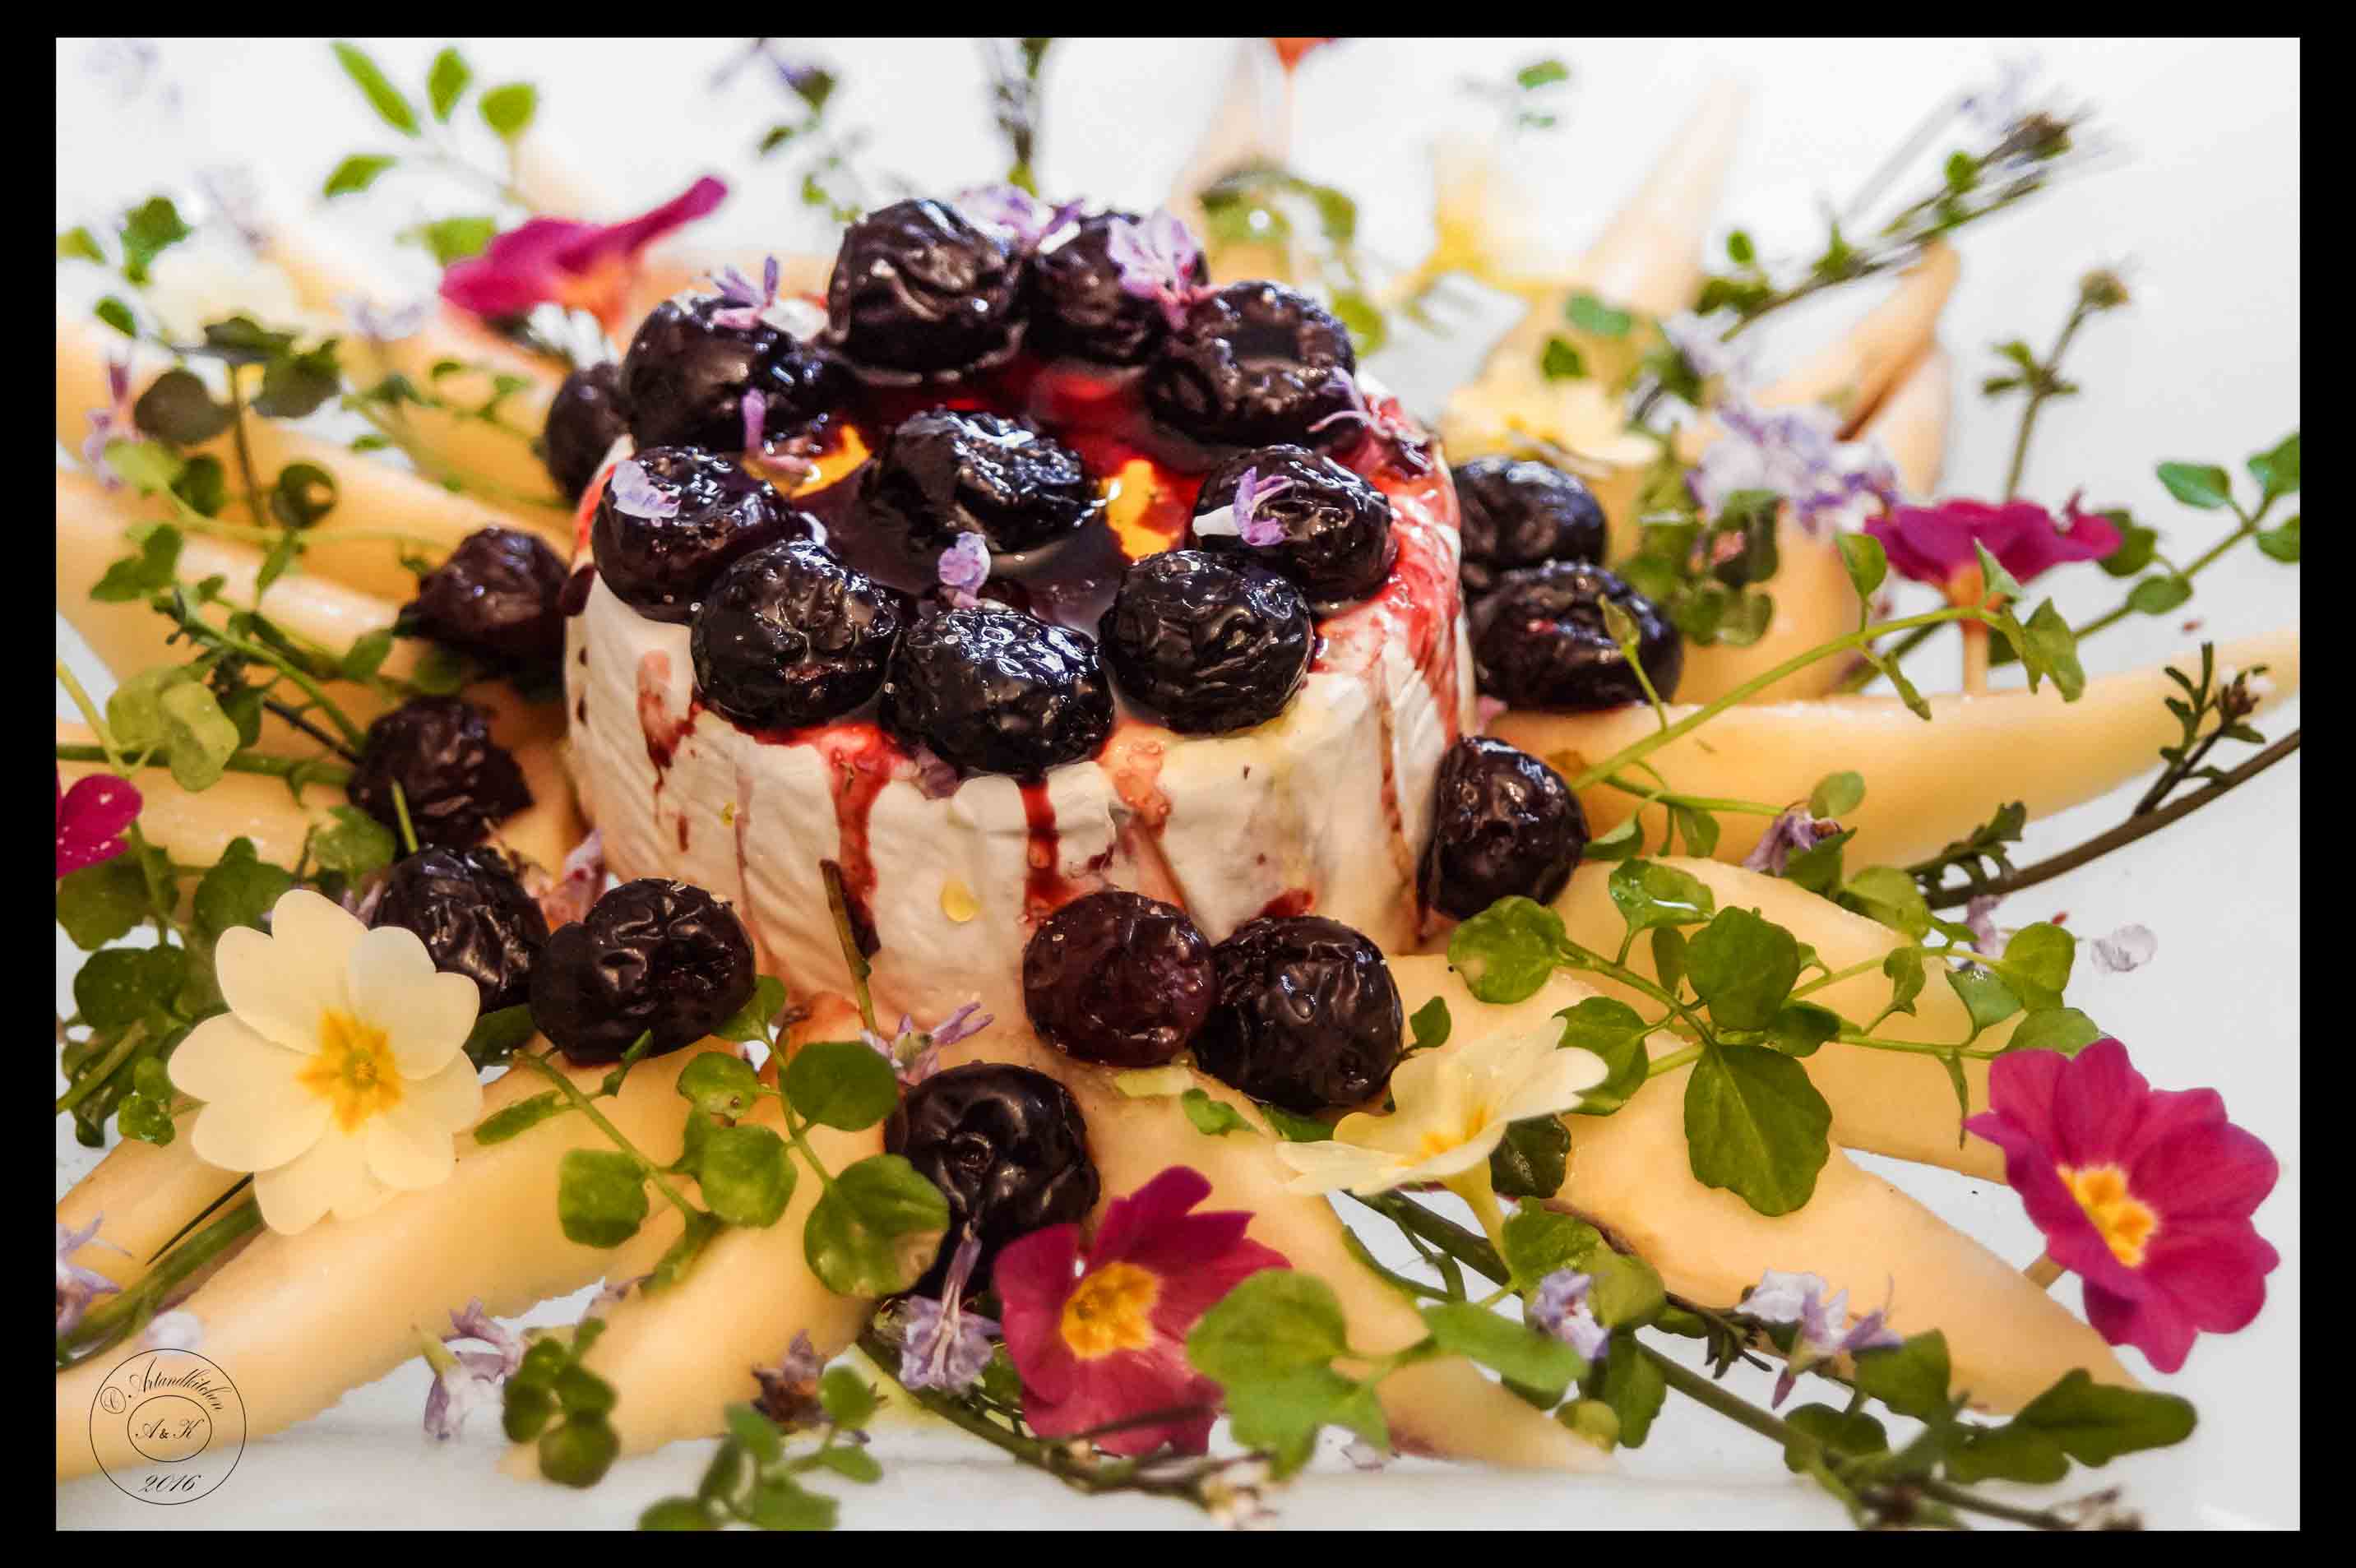
This dish composition started in my mind a few days ago as I discovered how wonderful roasted cherries… and I are still have some in the freezer! The new cherries season is approaching it’s a must use what I’ve stored from last year.

Bitter cress! Actually a lot of hairy bitter cress is growing in my garden. Long time ago a Chinese friend saw in this in my garden and he said that in China they have to “buy” it … and here is a weed! Well, not today, today this came on our dish and, yum, how good it is!

Flowers? Primroses, I already used them as decoration (see

White Muffins with Candied Flowers

) and rosemary flowers, the light sweet and spicy taste was perfect for this salad!

In the center of the ingredient I placed a light camembert cheese (20% fat); refreshing and not too fat!

Spring Celebration Salad

  • Servings: 3-6
  • Difficulty: medium
  • Print

by  https://artandkitchen.wordpress.com/

Spring-Celebration-Salad

You need

  • 150 g frozen cherries, already pitted (you can use more)
  • 1 pinch pepper
  • 5 tablespoons white balsamic vinegar, to taste
  • 1 piece Camembert cheese, if possible a light king (about 200 g)
  • Hairy bittercress, to taste (substitute any cress or arugula)
  • Edible flowers: primroses and rosemary flowers or other flowers (if you don’t get some you can add for the color for examples sliced yellow cherry tomatoes)
  • 2 small pears
  • 8 tablespoons olive oil, to taste
  • Salt and pepper, to taste

Procedure

  1. Place frozen cherries in one layer on a baking tray add a pinch or pepper and bake them at 250°C until juice reach a syrupy consistence.
  2. Place cherries in a small bowl for further use and dissolve the cherry syrup with the balsamic vinegar, sieve and set aside
  3. Wash gently the herbs and set aside.
  4. Place the cheese in the center of a serving dish.
  5. Peel and slice the pear (I dipped the slices in very light salted water to prevent browning) and arrange them on the plate
  6. Arrange herbs and flowers as well; I reserved some rosemary flowers
  7. Decorate the cheese with roasted cherries.
  8. Now you have cheese, pear, herbs, flowers and cherries on the plate. To finish drizzle the cheese with a few spoons of the prepared vinegar and some olive oil. Season with salt and pepper.
  9. Serve with the additional vinegar, olive oil, salt and pepper… so that everybody can add this when the need. Enjoy with bread!

Note: I used salt and pepper with dry flowers, it was a delish!

This slideshow requires JavaScript.


Quince Tarte Tatin

Quince-Tarte-Tatin-1

My quinces trees were very generous this year and not that the leaves are gone I still have these wonderful fruits which I appreciate so much. I hope more and more people will discover this fruit.

Today I prepared a tarte tatin inspired by the recipe I posted a few days ago: “Ayva Tatlısı – Turkish Quince Dessert”.

In fact the preparation of the poached quinces is almost the same, I only substituted the water by a sweet rose wine (could have been white or red as well).

I was tempted to add some color with some leaves as mint, thyme or some pistachios, but finally I found to let it as it is and for the picture place the main ingredients on the background.

This tarte tatin can be served as it is or still warm with some vanilla ice cream or other refreshing sauces. Up to you!


Quince Tarte Tatin

  • Servings: 6-8
  • Difficulty: medium
  • Print

Autor: https://artandkitchen.wordpress.com/ Quince-Tarte-Tatin-1

You need:

Poached quinces:

  • 2 medium quinces or 4 small quinces (total weigh before peeling and coring about 800 g)
  • 1/2 cups sweet wine
  • 1 cinnamon stick
  • 6 cloves (it works even using only 150g!)
  • 100 g sugar

Crust:

  • 1 cups flour (you may mix it with whole wheat flour)
  • 1/3 cup margarine or 1/3 cup butter
  • 1/2 teaspoon salt
  • 1 pinch baking powder
  • cold water (about 1 tablespoons)
  • 1 eggs, lightly beaten to brush (optional)

Procedure:

  1. Prepare a bowl with enough water to cover quinces when halved. Add lemon juice.
  2. Peel the quinces, and make slices cutting tangentially around the hard core. Place the slices directly into the bowl with lemon juice as soon as possible.
  3. Place the slices in a skillet, add wine and spices to the bottom of the skilled. Cover the quinces with the sugar.
  4. Cover with a lid and bring to boil, as soon as the boiling point is reached reduce the heat and let simmer for about 1 1/2 – 2 hours or until softened and color turned red. Check liquid from time to time and if necessary add a few tablespoons water from time to time. As more you cook the as reddish they will turn, I noticed that they turn also translucent.
  5. Remove from the heat and let cool down.
  6. Combine flour, margarine, salt and baking powder with a pastry blender or fork until balls are the size of large peas.
  7. Add egg and cold water working with the fork until the bowl starts to clean itself.
  8. Preheat oven to 450°F/230°C.
  9. Place a sheet baking paper on the bottom of you baking mold (I used a Springform, a mold with removable bottom).
  10. Arrange the quince on the bottom of the mold, let 1 cm (1/3 inch) free. Reserve the liquid.
  11. Roll out the dough on a floured surface to the size of 2 cm wider than the mold. Transfer the disk over the quinces and press down the dough on the reserved border for the “walls of the crust”.
  12. Bake 30 minutes or until the crust result crisp and golden brown. Let cool down 10 minutes and invert on a serving plate. Carefully remove the baking paper.
  13. Spread the reserved juice over the quinces.
  14. Serve warm with some ice-cream or at room temperature.

Quince-Tarte-Tatin-2


Zuppa di Pesce allo Zafferano – Soupe de Poisson with Saffron


Zuppa-di-Pesce-allo-Zafferano---Soupe-de-Poisson-with-Saffron-1The French “soupe de poisson” is very famous and popular not only in France since in Italy, Spain and Croatia.

The original fish soup was prepared should be prepared with different kind of fish and seafood using the head, shells and fish bones for the fish stock first.

In our case I used what I had in the freezer: calamari, shrimps and fish filets; please free to change the kind and the quantities of the fish/seafood.

The shrimps were already deveined, but shell on: I remove the shell and used it for the basic fish broth.

The stomach of the calamari had been removed, I used the body and the tentacles for the soup but I used the other part of the head (I removed the eyes first!  for the basic fish broth as well.

No fish heads were available, but I found that it could work without them.

I used vegetables give flavor and thickness to the soup.

We enjoyed this soup with homemade bread and skordalia (Greek potatoes and garlic spread).

Note: if you don’t have fish bones… use a fish stock, you will need to cook the veggies (step 8) for only about 20 minutes or until done.

Zuppa di Pesce allo Zafferano - Soupe de Poisson with Saffron

  • Servings: 4
  • Difficulty: easy
  • Print

Autor: https://artandkitchen.wordpress.com/

Zuppa-di-Pesce-allo-Zafferano---Soupe-de-Poisson-with-Saffron-1

You need

  • 2-4 tablespoons olive oil
  • Shells, heads …
  • 1 onion finely chopped
  • 4 garlic cloves, peeled whole
  • 1 glass white wine
  • 4 cups of water
  • 1 carrot, chopped
  • 2 tomatoes, chopped
  • 1 potato, peeled and chopped
  • 1 bay leaf
  • 1 small spring thyme
  • Salt and pepper to taste
  • 1 pinch saffron
  • 250-500 g squid, used small ones
  • 500-700 g fish filets
  • 250-500 g shrimps
  • Parley for topping

Procedure

  1. First of all prepare the shells, heads or other parts of fish which would be suitable for the basic broth.
  2. Heat 2 tablespoons of oil in a deep pot and fry the shells, heads … until fragrant. Remove from pot and set aside.
  3. Heat other 2 tablespoons of olive oil, add onion as well as whole garlic cloves and cook until translucent.
  4. Add wine and let boil for a few minutes.
  5. Add water and bring to boil.
  6. Add water, carrot, tomato, potato, bay leaf and thyme. Bring to boil and season with salt and pepper.
  7. Place the fried shells, heads, fish bones… in small kitchen towel, close this with a knot or cord. And place this in the pot as well.
  8. Cover and let simmer for one hour, but remove bay after 10 minutes or so.
  9. During this thyme slice the squid, but fish in bite sized pieces and refrigerate until needed.
  10. Remove the bag with the fish and pressing out the precious juices.
  11. Blend the vegetables in the fish stock, if necessary sieve them to get a smoother base.
  12. Add saffron, fish and calamari. Cook for about 30 minutes more without stirring. Add more water if necessary to taste: you would like a creamy but not too heavy soup.
  13. Add shrimps, season again if necessary.
  14. Serve immediately topped with parsley.
  15. To go with this toasted bread, croutons or simply rustic bread.

Salmon in Herbed Cream Sauce

Salmon-in-Herbed-Cream-Sauce

Salmon is one of the most popular fishes as taste and the pink color makes it very attractive

It is very healthy as well as it is rich of omega-3 fatty acids.

In Quebec as well in France this fish is prepared in many different ways as it is very versatile and easy to find it in the stores.

This quick recipe has been adapted from a ham rolls recipe, baked with cream, vine and herbs (clear French inspiration), I hope you will like it!

Salmon in Herbed Cream Sauce

  • Servings: 2-4
  • Difficulty: easy
  • Print

Autor: https://artandkitchen.wordpress.com/

Salmon-in-Herbed-Cream-Sauce

You need

  • 600-800 g Salmon filet (I removed the skin with the knife in advance, but it is not necessary), about 1 1/2 pounds or more if you like
  • 1 cup heavy cream
  • 3 tablespoons tomatoes concentrate
  • 1/4cup heavy red wine as Bordeaux
  • 3 tablespoons Cognac or other brandy
  • 2 teaspoons cornstarch
  • 2 teaspoons “herbes de Provence” or other herbs mix as you like (I suggest to add some fresh savory if you have it!)
  • Worcestershire sauce or soy sauce, to taste
  • Salt and pepper, to taste
  • 2 spring onions, thinly sliced (mine were violet at the base)

Procedure

  1. Preheat the oven to 180°C/350°F
  2. Prepare the salmon removing the skin if preferred (I recommend it as you will not eat the skin!).
  3. In a small bowl combine, cream, tomatoes concentrate, wine, cognac, cornstarch, herbs, and Worcestershire sauce. Adjust to taste with salt and pepper,
  4. Pour a few tablespoons of sauce in a baking mold and arrange salmon pieces. Pour rest of sauce over fish and bake it at 180°C/350°F for about 20 minutes until just done.
  5. Remove from oven, top with spring onions and serve immediately.