Cassis (Black Currants) and Lemon Cake

One of our absolute beloved, fresh and spongy super quick cake!  

The source of this recipe is a popular recipe which we got in Spain and we adapted it reducing the oil and the sugar only for personal taste. We use Greek plain yogurt + fresh lemon instead of yogurt with lemon taste. In Spain this cake is also called “bizcocho 1 2 3 “.

We prepare if you are traveling into holidays apartments (yes, we I carried the empty tin with us) for a fast breakfast and a snack for our road trips.

For the easiest version you may use the container of your yogurt as the measure of 1 cup.

See also the Spanish version on youtube: https://www.youtube.com/watch?v=pgdaD_EJX-E&ab_channel=Elrinc%C3%B3ndelpancasero

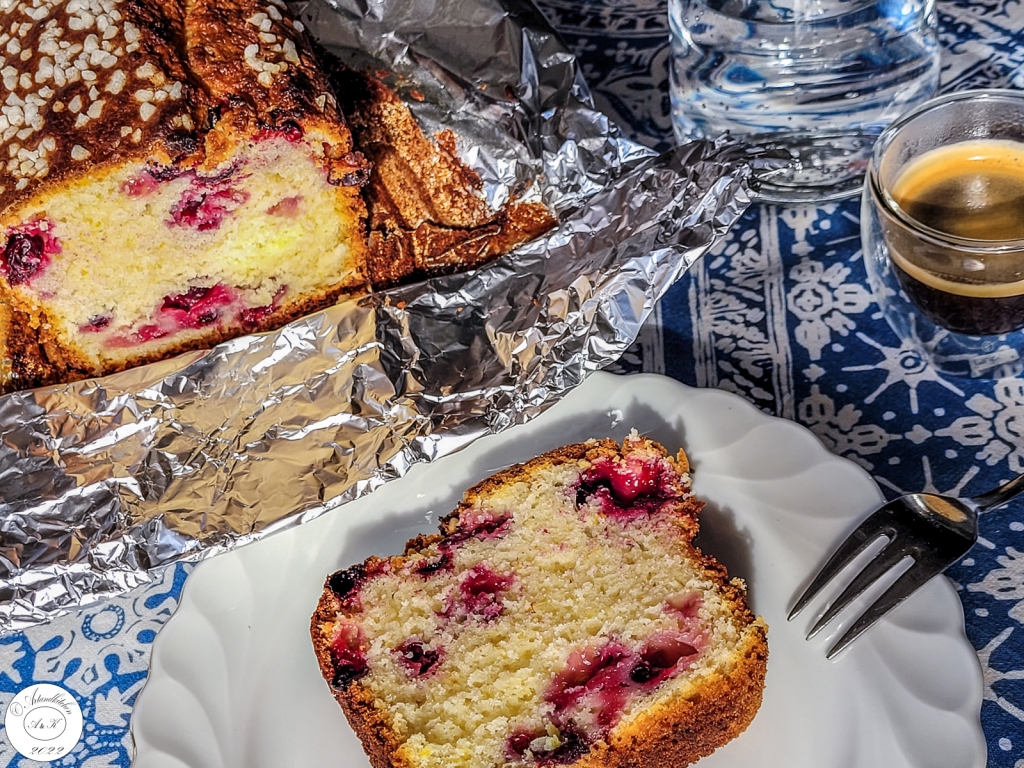
The combination of cassis and lemon gives to this cake a very strong and refreshing flavour.

We tried also these great variations:

  • Limes instead of lemons
  • Black berries, blueberries or “josta berries” instead of cassis
  • Skip the berries and convert this cake into a lemon cake

Black Currants and Lemon Cake

  • Servings: about 12
  • Difficulty: easy
  • Print

Ingredients

Batter:

  • 1 cup yogurt (any yogurt but for us Greek plain yogurt is the best)
  • ½ cup oil (original recipe: 1 cup)
  • 1 ½ cups sugar (original recipe 2 cups)
  • 3 (if you use the size of the container of the yogurt instead of “cup”) or 4 eggs (if using the official “cup”)
  • 1 lemon, zest grated
  • 1 lemon, juice
  • 3 cups flour
  • 2 teaspoons baking powder (1 envelope)
  • 1 teaspoon vanilla (1 envelope)

Fruits:

  • 1 cup black currents (cassis)  or other berries

Topping (optional)

  • Sugar pearls

Preparation:

  1. Preheat the oven to 180°C/350°F and line you mold (about 30 cm of length) with baking or aluminum foil.
  2. In a big bowl combine all the ingredients for the batter.
  3. Fold under the berries.
  4. Pour the dough into your prepared mold and add the topping.
  5. Cook for 50-60 minutes at 180°C/350°F or until done (toothpick test)
  6. Let cool down and serve.

Autor: https://artandkitchen.wordpress.com/  

Plum Almond Crumble Cake

This sumptuous delicious almond cake is topped with plums and perfumed with cinnamon. It has a soft base, a juicy fruity layer and at the same time it has a crunchy topping.

I imagine that this recipe could be used for many kind of fruits. Not only apricots, peaches, nectarines, but also apples, pears and why not, many kind of berries.

Plum Almond Crumble Cake

  • Servings: about 12
  • Difficulty: easy
  • Print

Ingredients

Tin preparation

  • Oil or butter to coat the tin
  • About 2 tablespoons ground almonds

Cake

  • 80 g oil
  • 185 g sugar
  • 4 large eggs
  • 250 g flour
  • 2 tsp baking powder
  • 1 tsp vanilla powder
  • 100 g ground almonds
  • 85 g plain Greek yogurt (10 %fat)

Topping

  • 500 fresh plums , quartered and stoned
  • Cinnamon to dust, optional

Crumble

  • 100 g ground almonds (minus almonds used for the tin)
  • 30 g flour
  • 50 g sugar
  • 50 g butter

Preparation

  1. Preheat the oven to 175°C (convection oven) or 180°C (conventional oven).
  2. Coat the tin (I used a 26 cm wide springform) with oil or butter and dust with ground almonds.
  3. For the cake, put the oil, sugar, eggs, flour, baking powder, vanilla, ground almonds and yogurt in a big bowl. Beat with an electric whisk until smooth and pour this batter into the tin.
  4. Arrange the plums vertically pushing them partially into the sponge batter and dust with cinnamon to taste.
  5. Put all the crumble ingredients in a bowl, cut in the butter with a forj and rub together with your hands until crumbly. Finally scatter the crumble over the plums
  6. Bake for about 50 minutes until done (test: a skewer poked into the cake mixture comes out clean but plums will remain sticky).
  7. Let cool down on a wire rack.

Serving suggestion:

  • Serve cold with plain yogurt, sour cream or whipped cream
    • Serve lukewarm with vanilla ice cream

Autor: https://artandkitchen.wordpress.com/  

Tiramisu Cake with Amaretto

In this blog I’ve already posted the recipe of our favorite tiramisu recipe with amaretto into a cake.

I replaced the raw eggs with more Greek yogurt which gives to the cake an additional fresh component and safer for the storage.

Make you family all tiramisu lovers happy with this simple recipe.

Tiramisu Cake with Amaretto

  • Servings: 12
  • Difficulty: medium
  • Print

Ingredients

Sponge

  • 110 g flour
  • 20 g cornstarch
  • 4 eggs (divided)
  • 120 g sugar
  • 1 teaspoon vanilla essence

Coffee brush

  • 100 ml strong coffee
  • 20 g sugar
  • 50 ml amaretto liqueur, quantity to taste J

Cream

  • 500 g mascarpone
  • 200 g Greek yogurt
  • 120 g sugar
  • 2 teaspoon lemon zest, grated (variation: orange zest); optional
  • 50 ml coffee

Dusting

  • 50 g dark chocolate, grated  (quantity to taste)

Procedure

  1. Combine together and sift well flour and cornstarch.
  2. In a big bowl beat to stiff picks the egg whites gradually add the sugar and beat until very thick and glossy.
  3. While the mixer is busy beating up those eggs and sugar, prepare one 26 cm spring-form by greasing it with butter and dusting it with four. Preheat the oven to 170°C.
  4. Add eggs yolks as well as vanilla and slowly until incorporated.
  5. Spoon half the flour mixture into the egg mixture. Using a spatula, gently fold in the flour. Do not use the electric mixer to add the flour, since this would deflate all the lovely air pockets that will help the cake to rise. Add the second half of the flour and again fold it in gently. Make sure to lift the mixture from the very bottom of the bowl as you fold in the flour.
  6. Spread it out into the spring-form evenly using the spatula. Bake for 30 minutes at 170°C or until done (toothpick test).
  7. Remove from the oven and place on a grid to cool down.
  8. In the meantime prepare the coffee brush combining well all the ingredients until the sugar is dissolved.
  9. Combine all the ingredients for the cream with an electric mixer.
  10. When the cake is cooled down, cut it into 3 layers. If you need some help for this step, check https://www.youtube.com/watch?v=RHyGSrCm8c8&ab_channel=GialloZafferanoItalianRecipes
  11. Place the top layer upside down on your cake-plate. Brush half of the coffee mixture and spread with a spatula more or less one quarter of the cream. Grate some dark chocolate on the surface of the cream. Repeat with the second layer, coffee, cream and chocolate.
  12. To finish place the bottom layer (upside down) on the top, spread another quarter of cream and dust with the chocolate. Place the remaining cream into a small plastic bag, cut the tip and pipette the cream to decorate the cake.
  13. Place into the fridge for at least 4 hours before serving.

Autor: https://artandkitchen.wordpress.com/  

Pumpkin Pudding

It’s pumpkin time and this recipe is an easy way for a tasty recipe and yummy dessert.

I used fresh pumpkin from the garden, which I previously baked und the microwave (10 minutes at max) and blended after cooling down.

How to prepare caramel sauce directly into the mold; Preheat oven to 200°C. Lightly grease your mold with butter. Scatter 50 g brown sugar to the baking dish and 2 tablespoons butter spreading evenly. Place in the oven until you see it begins to turn lightly darker. Remove from the oven and whisk shortly. Return to the oven and continue to bake a few minutes until a brown color is reached (be careful, do not burn it). Let cool in the mold.

Pumpkin Pudding

  • Servings: 12
  • Difficulty: medium
  • Print

Ingredients:

  • Butter or margarine for the mold
  • 4 tablespoons caramel sauce for the mold (quantity to taste)
  • 500 g pumpkin puree
  • 75 ml olive oil
  • 100 g flour
  • 20 g conrnstarch
  • 100 g sugar
  • 1 egg
  • 1/2 teaspoon cinnamon (quantity to taste)
  • 1/2 teaspoon gingerbread spices (quantity to taste)
  • 1 teaspoon vanilla
  • 1 pinch salt
  • 1 teaspoon baking powder

Preparation:

  1. Prepare the baking mold: grease with the butter or margarine and pour the caramel sauce
  2. In a big bowl blend very well all the ingredients together.
  3. Pour the ingredients in the prepared baking mold
  4. Bake in the oven at 170°C for 45 minutes or until golden.
  5. Remove from the oven and let cool down completely.
  6. Invert on a plate for serving.

Autor: https://artandkitchen.wordpress.com/  

Apple Rose Tart

A romantic tart perfect for many occasions, made with simple ingredients.

For this tart I used small apples with too small to be peeled, but very much suitable for this recipe.

It’s difficult to know how many apples you will need, but any additions prepared apples could be kept in the fridge and served the next day with some vanilla ice cream.

Apple Rose Tart

  • Servings: 8
  • Difficulty: medium
  • Print

Ingredients:

Crust:

  • 200 g flour
  • 100 g almond flour (I grinded 100 g unpeeled almonds)
  • 100 g margarine
  • 1 egg
  • 1 pinch salt
  • 1 teaspoon vanilla powder (or to taste)

Apple Flowers:

  • 6-8 medium red apples (or 12 small apples), quantity to be adapted
  • 4 tablespoons sugar
  • 1 teaspoon cinnamon
  • 1 tablespoon lemon juice

Vanille Custard:

  • 500 g milk
  • 40 g cornstarch
  • 2 eggs
  • 70 g sugar
  • 1 teaspoon vanilla powder ( or to taste)

Dusting:

  • Powdered sugar

Procedure

  1. Combine the ingredients for the crust in bowl until a dough is formed. Place the dough in the fridge to rest for a while.
  2. Cut apples in quarters and core them. Make very thin slices using a sharp knife or a mandolin.
  3. Once all apples have been sliced, add sugar, cinnamon and lemon juice. Stir well and let sit.
  4. Preheat the oven to 175°C (340 °F).
  5. Grease a 12-inch (30 centimeter) tart pan and dust with it with flour. Roll out the dough using some cornstarch (this make it much easier to roll it out) and line it in the pan.
  6. Place the pan in the middle rack of oven and bake until golden brown, 30-35 minutes. Remove from oven, press any puffed up areas lightly with a spoon (I pressed the puffed up areas also during the baking time). Place the tin on a wire rack and cool completely.
  7. In a medium sauce pan heat the milk until it begins to simmer.  Meanwhile, in a medium bowl whisk together the eggs, the sugar, vanilla and cornstarch. Continuously whisking, very slowly pour the hot milk into yolk mixture. Once fully combined, return mixture to saucepan and cook over medium heat. Cook at low heat, stirring until mixture begins to thicken to a pudding-like consistency, and bubbles to break the surface. Remove from the heat and whisk from time to time while cooling down in order to keep it smooth and no “peel” will be formed).
  8. Now it’s time to make apple slices pliable. For this place them in the microwave for about 2-3 minutes. Place in a plate to cool down.
  9. Remove crust form the pan and place it on a serving plate. Fill it with the cooled down (or at least lukewarm) custard.
  10. Place the apple slices in with overlapping ends in order to form flowers. If you are working with medium apples you may prepare the roses in your hands and place them on the custard. In my case, with very small apples, I placed each slice directly on the custard. Reserved the juice witch will be produced for brushing.
  11. Bake in the preheated oven at 175°C (340 °F) for about 20 minutes. Quickly brush the apples with the reserved juice and bake for other 10-15 minutes until the edges of the apples begins to turn golden.
  12. Remove from the oven and place on a grid to cool down.
  13. Serving suggestion: dust with powdered sugar before serving.

Autor: https://artandkitchen.wordpress.com/  

Rhubarb Tarte-Tatin

This month we got a lot of rain! Too much! Nevertheless my rhubarb seems to like it and it is growing like a weed.

The best way to keep it under control and make my family happy is to bake something with it! 

In the past years I made different cakes with rhubarb, but as usually I wish to try something different and see how it comes out!

This recipe is super simple, not so many ingredients are needed, it is quick done and it looks fabulous!

Serve this fresh cake best with roasted pistachios or almonds.

Rhubarb Tarte-Tatin

  • Servings: 8
  • Difficulty: easy
  • Print

Ingredients

Base:

  • 15 g butter, melted
  • 100 g sugar
  • 500 g Rhubarb, cleaned cut into 3-5 cm pieces (or as you like)

Batter:

  • 50 g butter, softened
  • 150 g Greek yogurt
  • 100 g sugar
  • 1 teaspoon vanilla sugar
  • 2 Eier
  • 225 g flour
  • 1 teaspoon baking powder

Topping:

  • 2 tablespoons chopped roasted pistachios (alternative: almonds)

Procedure

  1. Preheat the oven to 200°C/400°F.
  2. Cover the bottom of a Springform with baking paper.
  3. For the base: Brush with the melted butter and sprinkle with the sugar. Arrange Rhubarb on it.
  4. In a bowl, whisk together the butter, the yogurt, the sugar and the vanilla sugar. Add the eggs and whisk until well combined.
  5. In another bowl, sift together flour and baking powder.
  6. Add the dry mix to the wet mix and incorporate well with a spatula.
  7. Spoon the batter over the arranged rhubarb and smooth well with a spatula.
  8. Bake at 200°C/400°F for about 30-35 minute or until risen, golden brown and a skewer inserted into the middle of the cake comes out clean.
  9. Remove from the oven and let sit for about 5 minutes. Run a knife around the edges and carefully remove the border of the Springform and let cool down completely on a grid.
  10. Invert on a serving plate, remove the bottom of the Springform and carefully the baking paper.
  11. Serving suggestion: garnish with chopped roasted pistachios.

Autor: https://artandkitchen.wordpress.com/

Melt in the Mouth Orange Cake

I made this cake for the first time many years ago, but it was so delicious that my family did not forget this melting in the mouth cake, so that they asked me for this a few times again.

Melt in the Mouth Orange Cake

  • Servings: 12
  • Difficulty: easy
  • Print

Ingredients

Cake:

  • 3 cups flour (about 400 g)
    • 2 teaspoons baking powder (1 envelope)
    • 1 pinch salt
    • 4 tablespoons butter or margarine (about 55 g)
    • 1 cup sugar (about 200 g)
    • 3 eggs
    • 1 cup fresh orange juice (about 200 ml)
    • 1 orange zest

Filling and frosting:

  • 4 tablespoons butter (about 55 g)
    • ¼ cups fresh orange juice (about 50 ml)
    • 1 orange zest
    • 3 cups powdered sugar (about 375 g)

Procedure:

  1. Preheat the oven to 190°C/375°F.
  2. Grease and dust with flour a 24-26 cm (9-10 inches) round cake pan. (Springform).
  3. Sift together in a bowl the dry ingredient (flour, baking powder and salt).
  4. In a large mixing bowl (or food processor), cream the butter, then slowly add the sugar, blending well. Add the eggs one at a time, beating well after each is added.
  5. In another bowl, mix together the orange juice & zest.
  6. Add this orange mixture spoon by spoon to the butter/sugar/egg mixture beating constantly.
  7. Step by step add the dry mixture until well incorporated.
  8. Pour the batter into the prepared cake mold bake for 40-45 minutes or until through (I recommend the toothpick test).
  9. Cool in the pans on a wire rack for about 15 minutes, then remove from the pans and cool completely.
  10. Slice the cake into 2 layers.
  11. For the frosting, melt the butter, then combine it with the orange juice and the zest, beating well. Slowly add the powdered sugar and beat well until smooth.
  12. Place the bottom cake layer on a serving plate and using, using about 1/3 of the frosting, frost the first layer. Put the second layer upside right on the first layer. Frost the top and the sides of the cake, or only the top allowing some of the frosting to run down the sides.

Autor: https://artandkitchen.wordpress.com/

Day 27 Stay at Home or In the Garden: Overnight Sourdough Waffles

Who does not dream warm crispy waffles for breakfast?

Our daughter prepared her new sourdough starter and this was her very first recipe with her new “baby”. We enjoyed these super delicious waffles for breakfast with our honey.

This waffles can be prepared with sourdough starter leftovers after refreshment of your culture.

At the end, we got much more waffles than what we needed, but we froze what we did not eat and we will probably reheat the waffles directly placing them for a very short time in the hot iron again! Here other ways to reheat them: https://www.vintagecooking.com/how-to-reheat-leftover-waffles/

Overnight Sourdough Waffles

  • Servings: 20 pieces
  • Difficulty: easy
  • Print
     

Ingredients

Overnight Dough

  • 1 cup active sourdough starter 
  • 1 cup yogurt
  • 1 cup milk
  • 2 cups flour
  • 6 tablespoons sugar

Final Batter

  • 2  eggs
  • ¼ cup  melted butter or vegetable oil
  • ½ teaspoon salt
  • 1 teaspoon baking soda
  • 1 tablespoon vanilla

Instructions

  1. Combine and mix all the ingredients for the Overnight Dough in a big bowl. Cover (do not close tightly). Let sit overnight at room temperature or for more or less 8 hours. After this time the dough should be risen and a spongy.
  2. In a bowl, combine the additional ingredients.
  3. Stir or better fold under this mixture into the sponge. The dough should stay soft!
  4. Preheat your waffle iron.
  5. Cook the waffles according to your waffle maker’s instruction.
  6. In our case, we used ½ cup batter for each waffle (about 10 to 10 cm square). This took 5 minutes for each pair of waffles. After this time, they were golden brown, cooked through and crispy outside. To remove the waffles form the iron we used a silicon spatula.
  7. Repeat with the remaining batter. At the end, we got 20 waffles.

Autor: https://artandkitchen.wordpress.com/

This slideshow requires JavaScript.

Day 4: Stay at Home or In the Garden; Poached Pears with Saffron and Chocolate Sauce

It’s very quite around us, not so much noise as usual. The sun is warm and  we are lucky we have a garden where we can sit outide and enjoy the day with homemade preserved products.

Pears are an excellent canning fruit because they keep their shape (let simmer only gently) and if places in nice jar, they make wonderful presents.

For this process, it’s necessary to use firm maybe lithely unripe pears. Peel them using a potatoes peeler taking care, not to remove the stem.

I used small pears from the Turkish shop (the same pears I am used to fin on Crete in October), but if you have big pears, suggest to peel them and cut them into big slices.

I prepared this jars in December just before Christmas and today we decided to enjoy them in the garden because we got another warm early spring (or better late winter) day.

Poached Pears with Saffron and Chocolate Sauce

  • Servings: 6
  • Difficulty: medium
  • Print

Ingredients

Poached pears

  • 12 small or 6 medium firm pears, whole and peeled
  • 200 ml water
  • 200 ml white wine
  • 200 g sugar
  • 1 big pinch (about ½ tsp) saffron stems
  • 6 green cardamom pods, lightly crushed
  • 1 pinch cinnamon

Chocolate sauce ( for 2-4 persons)

  • 1/4 cup heavy cream
  • 2-4 tablespoons brandy
  • 50 g bittersweet chocolate, diced

Procedure

  1. Mix water, wine, sugar, and spices into a saucepot and bring to simmer for 15 minutes.
  2. Add pears and poach covered. For this procedure do not bring to boil. Cook, partially covered, turning occasionally, for20 to 30 minutes or until pears are just tender.
  3. Use a slotted spoon to transfer the pears and arrange the, upright into jars. Try to place them quite tightly.
  4. Cover the pears with the hot syrup leaving 1/2-inch headspace in each jar. Secure canning lids.​
  5. Process in a boiling water bath (80-85°C), 20 minutes for 500 ml jars or 25 minutes for 1000 ml jars. Store them in a chilly place.
  6. For the chocolate sauce: heat heavy cream with brandy in the microwave (about 30 seconds) until hot but not boiling. Add chocolate and stir to dissolve. If necessary place a few more seconds in the microwave.
  7. Place pears into single serving plates, add some syrup (optional), top with warm chocolate sauce and serve immediately.

Autor: https://artandkitchen.wordpress.com/

Almost only Apples Cake


This is he cake I was looking for, as I needed a cake, which include a lot of apples and as less as possible flour and fats! It is not my creation I found it on Eryn’s blog (http://erynfollecuisine.canalblog.com/archives/2008/02/06/7847617.html) and I adapted it to my ingredients.

The result is awesome: juicy, tender, fresh and melting in the mouth!

This recipe could be regarded as basic recipe (my recipe is already a variation on the Eryn’s one); you may add cinnamon, cardamom, grated lemon peel, nutmeg, brandy, amaretto or what you wish! Have fun and enjoy this delicious healthy cake.

In the original recipe it was suggested to add 100 mL water, but I omitted this as I wanted to be sure that the cake would set enough.

Almost only Apples Cake

  • Servings: 8
  • Difficulty: easy
  • Print

Ingredients

  • 6 apples (alternative 4 apples and 2 pears)
  • 70 g flour
  • 1 teaspoon baking powder
  • 2 teaspoons vanilla sugar
  • 1 pinch of salt
  • 2 eggs
  • 70 g sugar
  • 20 g melted butter
  • Powdered sugar to dust

Prcedure

  1. Preheat the oven at 200°C.
  2. Butter and dust with flour a 24 cm (about 9 inch) round mold.
  3. Peel apples (and pears if used) and place them in a bowl with water (I add some salt in order to prevent oxidation).
  4. Combine in a bow: flour, baking powder (sifted), vanilla sugar and salt.
  5. In another bowl beat egg and sugar until foamy and very soft. Add the butter and mix shortly.
  6. Fold the flour mix under the egg mix.
  7. If you used also pears, divide the batter into both bowls: 1/3 for the pears and 2/3 for the apples-
  8. Remove the core of the fruit and slice them into very thin slices.
  9. Place the apples (and the pears if used) in the corresponding bowl of batter and stir to coat them well.
  10. Place the apple mixture in the prepared mold and level them with a spatula. If you used also the pears, layer the batter with the pears over the apple layer, level again with the spatula.
  11. Bake in the preheated oven at 200°C for about 40 minutes until golden and set.
  12. Let cool partially and dust with powdered sugar.
  13. Serve lukewarm and cold.

Autor: https://artandkitchen.wordpress.com/