Small Chili Peppers Stuffed and Preserved in Oil

Early this year we saw indoors many kind of peppers and chilies, now in September many of them are ready and it’s a challenge to use them all.

We love to prepare them in the oven (see also……) as still green; we do not use only the “Pimientos de Padron” peppers for this recipe, we found that most peppers are great for this preparation.

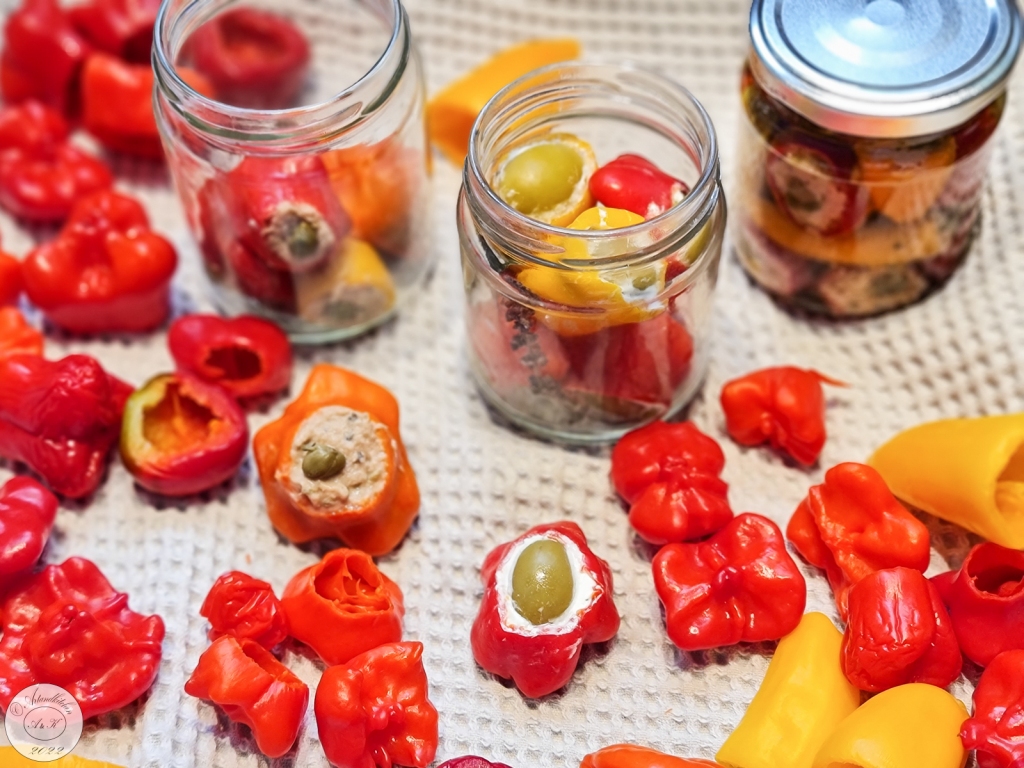
I bought also some small round peppers called “ciliegia piccante” peppers, which are very often served stuffed and preserved in oil.

This time I used to prepare this recipe and as we had different kind of small (chili) peppers, we decided to use them in this way.  The “pimientos de Padron” I got are quite hot (may be as we had a hot and dry summer), and with this preparation we can reduce the heat and prepare something which can be enjoyed in winter as well.

We prepared two kinds of stuffing: one with tuna fish and the other with cream cheese.

As pepper we used: hot “cherry peppers”, some “aji amarillo”, “Bishop’s Crown” Peppers, small mini peppers (as for snacks), “pimientos de Padron” peppers and some simply sweet small round peppers.

All peppers where precooked in a vinegar solution and the jars were sterilized for longer storage.

Try these stuffed pepper recipe, this makes a truly impressive antipasti dish. These small peppers are bursting with flavour, thanks to the herbed fillings.

Small Chili Peppers Stuffed and Preserved in Oil

  • Servings: prepare as much as you need
  • Difficulty: medium
  • Print

Ingredients

All quantities of the recipes are only a reference, you should adapt it to your taste

First step: Boiling

  • Mini peppers or chilies, stem and seed removed
  • 250 ml white wine vinegar
  • 50 ml water
  • ½ teaspoon salt

Second step: tuna stuffing

  • Drained tuna fish in oil
  • Capers to taste
  • Chopped green olives to taste
  • Salt to taste
  • Dried basil to taste
  • Pepper to taste to taste

Third step: cream cheese stuffing

  • Cream cheese with herbs
  • Pitted big green olives
  • Herbs or bay leaves, optional

Fourth step: preservation in oil

  • 200-450 ml jars
  • Olive oil or sunflower oil (or mixture) as needed

Procedure

  1. Remove carefully the stem and all seeds from the peppers using surgical gloves.
  2. Bring to boil vinegar, water and salt.
  3. Boil the peppers in bathes for 2 minutes, drain them quickly and place them on a towel cut side down to dry until next day (or at least 4 hours).
  4. Mix the ingredients for the tuna fish mix in bowl, blend shortly to make them smoother
  5. Fill peppers with tuna fix mixture and top with one additional capper. Place them into a small jar (filling looking outside).
  6. Fill peppers with herbed cream chess and close the opening with halved olives. Place them into a jar and add some herbs (I used thyme and bay leaves).
  7. Fill the jars with oil trying to release the air bubbles from the gaps. Close well the jars.
  8. Place the jars into big pot (or use a canner). Fill with warm water. The water must cover the jars by 2 cm. Bring to a rolling boil, cover the pot and boil for 30 minutes if using 250-450 ml jars. Let cool for 20 minutes before removing the jars from the pot.
  9. Enjoy after at least one week. If correctly canned this can be stored for a few months in the fridge or a cool and dark place.

Suggestions:

  • Remains of the oil can be added to your tomato sauce recipe.
  • Do not throw away flesh and seeds, soften them gently in olive oil for about 15 minutes, and place them into a teabag, transfer with the oil into a jar and cover with more olive oil. Keep cover with oil. You will get a wonderful hot and spicy olive oil for you dishes. During the storage this will turn hotter.

Autor: https://artandkitchen.wordpress.com/  

Easy Pizza Rolls from Scratch

These pizza rolls are surprisingly easy to be prepared, but you need to start about 3 hours in advance as the dough need some time for rising. If you do not have time, skip the homemade pizza dough and try with a good quality store bough pizza dough.

The proposed filling is very simple, but you any other ingredients you like on pizzas.

Easy Pizza Rolls from Scratch

  • Servings: 24 pieces
  • Difficulty: easy
  • Print

Ingredients

Pizza Dough

  • 500 g flour
  • 300 ml water, lukewarm (about 30°C)
  • 1 teaspoon dry active yeast
  • 1 teaspoon salt
  • 4-5 tablespoons olive oil (or as needed), this for the dough and for rolling

Filling

  • 1 tin chopped tomatoes (pelati), drained
  • 1 tablespoon tomatoes concentrate paste
  • 1 tablespoon pesto
  • ½ teaspoon oregano, dried (quantity to taste)
  • Salt and pepper to taste
  • 250 g shredded mozzarella cheese (store bought)
  • 2 tablespoons grated parmesan cheese
  • Additional ingredients to taste: dried onions, olives, capers….

Preparation

  1. Dissolve the yeast in about 100 ml water and 50 g of flour. Wait until yeast is active and foamy.
  2. Now all the remaining flour, water and salt. Mix well and set aside for about 20-30 minutes.
  3. In the meantime place drain the tomatoes over a sieve in order to eliminate excessive water.
  4. Stretch and fold about 5 times or until dough becomes elastic and smooth. For this step I add about 1 tablespoon of oil on the sides of the bowl. Cover and set aside until doubled.
  5. Roll out the dough on a well-floured surface to the size of about 40 X 60 cm.
  6. Combine the drained tomatoes with the tomatoes paste, the pesto, the oregano and adjust to taste with salt and pepper.
  7. Spread the tomatoes mixture over the dough letting about 3 cm of the long side free (you will need the border to close the roll). Sprinkle mozzarella and parmesan. Top the cheese with additional ingredients to taste.
  8. Start rolling the dough from the long side to a tight log. Seal the end by pinching the dough free of filling.
  9. Spread about 3 tablespoons of olive oil over the log and coat it well with your hands or a baker’s brush.
  10. Using a super sharp knife slice the pizza dough log into equal rolls, placing them onto baking tray lined with parchment paper.  For this step I made 24 pieces for 4 x 6 rolls in my baking tray. We prefer to bake these on a tray quite near to each other so that while rising they will fill the tray completely; the oil will make the step of separating them super easy.
  11. Brush the top rolls with little olive oil.
  12. Let the rolls rise for about 1 hour or until you see the dough is filling the gaps of the tray between the single rolls before baking.
  13. Preheat the oven to 200°C.
  14. Important: just before baking splash about 1/2 cup of water into the oven (if not possible place a flat bowl with boiling water into the oven)  in order to increase the humidity. Place immediately the tray into the oven and bake for about 25 minutes or until the dough appears golden.
  15. Remove from the oven and cool the rolls for 10 to 15 minutes before serving or let cool down partially, cover with parchment foil and serve when desired.  We love them lukewarm.
  16. Store any leftovers in airtight containers in the refrigerator for up to 5 days and kept frozen for up to three months.

Autor: https://artandkitchen.wordpress.com/  

Mast-o-Khiar – Persian Yogurt Dip

ماست و خیار Mast-o-khiar is a delicious, cooling and very popular Persian dish that is served with most meals. You will find the combination of yogurt and cucumbers in Greece (Tsatziki), but also in many other Balkan and Arabic countries and as well from Turkey to India (Raita).

The use of rose petals (fresh or dried) and rosewater for cooking was popular all over the Middle East and spread to Europe during the Middle Ages.  However rosewater had been replaced by vanilla once world exploration had been brought from America to Europe. 

About 20 years ago we planted in our garden a very strong scented white and red striped rose, since then its petals had been used in our cooking for several sweet recipes and we prepared hundreds of rose jam jars.

The basic ingredients for Mast-o-Khiar are yogurt, cucumber, mint, rose petals, salt and garlic. Other herbs can be added as well as chopped walnuts and raisins.

Tip: skip the cucumber for a delicious sauce for salad.

Mast-o-Khiar - Persian Yogurt Dip

  • Servings: 4
  • Difficulty: easy
  • Print

Ingredients

Dip:

  • 1 cup Greek or Balcan yogurt ( better 7-10% but you may also use the 2% fat reduced quality)
    • 100 g (about ¾ cup) chopped cucumber
    • 2 tablespoons fresh mint, chopped (I use the “Diosmos” Greek mint for this dish)
    • 1 tablespoon fresh dill, chopped (optional)
    • 1 garlic clove pressed or/and 2 tablespoons fresh chives finely chopped
    • 2 tablespoons dried rose petals, crushed or minced
    • salt and pepper to taste
    • 2 tablespoons chopped walnuts (optional)
    • 2 tablespoons coarsely chopped raisins (optional)

Topping (as desired):

  • dried or/and fresh rose petals
    • dried or/and fresh mint
    • dried or/and fresh dill
    • chopped walnuts
    • raisins

Procedure

  1. Combine well all the ingredients for the dip and adjust salt and pepper to taste.
  2. Pour the mixture into a serving bowl or dish. Refrigerate for at least one hour or best to allow the flavors to blend.
  3. Just before serving, sprinkle the ingredients for the topping with a nice geometrical pattern or simply randomized.

Autor: https://artandkitchen.wordpress.com/

See also:

Xortopita – Greek Greens Pie

Wild greens constitute one of the greatest capital of Cretan cuisine. No one knows exactly how many different species of plants are used for human consumption and helped these people to survive during wars and occupation times.  I read that more than 120 herbs from the coastal zones to the higher mountain regions have been identified and counted.

Picking wild greens is a very enjoyable activity and the prepared meals are super healthy food!

For this recipe I used self-seeded Swiss chard form last year who is sprouting here and there in my vegetable garden. A great gift form the nature.

For the “Cretan” flavourful taste, I added mint and dill and some feta.

Usually these greens pies are prepared in the oven and the dough used for this is the filo.

One of the specialties of Sfakia are the “Sfakianopites”:  round flat pies filled with local mizithra cheese, pan-fried (without oil or butter) and then, served with a generous drizzle of Cretan honey.

For this pies I used the technique of the sfakianopites and worked very well.

For the dough I used my sourdough recipe which, thanks to the long ferment time, turns very elastic for rolling it out. https://artandkitchen.wordpress.com/2018/05/07/basic-bread-recipe/

For the yogurt sauce see: https://artandkitchen.wordpress.com/2013/02/18/mint-and-dill-yogurt-sauce/

Xortopita - Greek Greens Pie

  • Servings: 6
  • Difficulty: medium
  • Print

Ingredients:

Dough

  • ½ cup sourdough starter (or ¼ cup water + ¼cup flour + 1/4 teaspoon dry yeast)
  • 1 cup water
  • 3 cups flour
  • 1 tablespoon salt

Filling

  • 300 greens (I used the green part of Swiss chards)
  • 2 tablespoons olive oil
  • 1 medium onion, finely chopped
  • 3 spring onions, finely chopped, tender green part as well
  • 3 tablespoons cup finely chopped fresh spearmint
  • 2 tablespoons finely chopped dill
  • 200 g crumbled feta
  • Salt and pepper to taste

Prodecure:

  1. Combine the sourdough starter with the water and the first cup of flour for the first rising into a big bowl, cover and let sit until spongy. The time depends of the kind of yeast (if using sourdough starter often I combine them the evening before or early in the morning) and the temperature.
  2. Add the the other two cups of flour and the salt for the second rising knead shortly and let lit for about 20 minutes. Now knead again until smooth. I perform this step directly in the bowl using a dough spatula and folding over the bread until done. Let rise a few hour until doubled. During this time prepare the filling.
  3. Wash the greens and drain very well. Then slice them.
  4. Heat the oil and fry the onion until translucent. Add the greens and cook stirring from time to time until the liquid is almost adsorbed.
  5. Add the herbs and combine well.
  6. Add the feta and season to taste with salt and pepper. Place on in a bowl to cool down.
  7. When the dough is soft, divide it into 6 pieces. Make 6 portions of filling. Note: you may make also more pieces/portions and make smaller pitas.
  8. Roll out the dough to the size of about 15 cm on a well-floured surface. Place the filling on it and carefully close the filling into the dough trying to exclude as much air as possible.
  9. Dust well with flour and slowly roll this out to the desired size. I made round of about 25 cm. Do not staple them, but place them on a well-floured surface until cooking time.  Best if you would in team and somebody helps you the roast the pitas while you roll them out.
  10. Heat a skillet and roast dry on both sides until browned. Note: We decided to cook them on the open fire.
  11. Serve if warm with yogurt sauce.
  12. Leftovers may be kept in the fried for a few day or be frozen.

Autor: https://artandkitchen.wordpress.com/

Guacamole con Tomates

Guacamole is very popular Mexican dip with many variations.

This variation, which includes also the use of tomatoes, is the most appreciated in our family and every times is comes out a bit different as we do not measure the ingredients, we change it a little bit depending on what we have on hand.

This is great as appetizer with tortilla chips, but also with wraps or other dishes.

Guacamole con Tomates

  • Servings: 2
  • Difficulty: easy
  • Print

Ingredients

  • 50 g chopped onions
  • 1 avocado, ripe
  • 1 tablespoon lime juice
  • 1 tablespoon fresh cilantro, chopped
  • 1 pinch of salt, to taste
  • 1 medium tomato or about 10 cherry tomatoes, diced
  • 1 teaspoon Worcestershire sauce (optional)
  • 1 dash chili powder or other little chili sauce or some paprika powder (optional)

Procedure

  1. Place the chopped onions in a small bowl with cold water (this for about 10 minutes)
  2. In a small bowl mash the avocado with the fork
  3. Drain the onions and add them to the mashed avocado along with the other ingredients.
  4. Combine very well and season to taste

Autor: https://artandkitchen.wordpress.com/

Roasted Figs with Camembert Cheese and Honey

Camembert Cheese Figs trees are native in the Middle East and western Asia and had been cultivated since ancient times. Today they are widely grown throughout the world, both for its fruit and as an ornamental plant. Two crops of figs can be produced each year. The first or breba crop develops in the spring on last year’s shoot growth. The main fig crop develops on the current year’s shoot growth and ripens in summer (August in Southern Europe) or autumn (September to October in Central Europe). The main crop is generally superior in quantity and quality, but some cultivars produce good breba crops. There are three types of edible figs: some of them need pollination by the fig wasp with pollen for fruiting and some not. In Central Europe where this wasp is not present, the cultivation of figs is possible. This year we had a many figs during summertime (breba crops) and in addition, after the warm September, we are getting many figs again and we are enjoying them. I would like to present you this simple but very impressive recipe, which is perfect for a starter or appetizer.

Roasted Figs with Camembert Cheese and Honey

  • Servings: 8 figs
  • Difficulty: easy
  • Print

Ingredients:

  • 8 Figs, washed
  • 100 g Camembert cheese or Brie cheese, diced
  • Nutmeg, quantity to taste
  • Salt, only a very small pinch for each fig (I used my basil flower salt)
  • blanched sliced or slivered almonds (alternatively chopped walnuts)
  • 4 teaspoons honey, quantity to taste
  • Fresh savoury or thyme (alternatively dried thyme)

Procedure:

  1. Remove the stem of the figs and simply slice into the figs as if you were quartering them but do not go all the way down. You want the figs to open out like a flower but not fall apart completely.
  2. Distribute the cheese into the center of the figs
  3. Sprinkle little nutmeg and salt on them
  4. Adjust the almonds over the cheese
  5. Bake them in the preheated oven at 200°C/400°F or until the almonds are lightly roasted and the cheese begins to melt.
  6. Arrange the figs on serving dishes spoon the honey over them and add the herbs.
  7. Serve if possible immediately
Autor: https://artandkitchen.wordpress.com/

Speckgugelhopf with Walnuts – (Sourdough Version)

Traditionally bakers make this rich Alsatian (southern part of France near the Swiss border) bread in hand-painted earthenware molds, but steel, non-stick-metal or glass molds are fine too. The size of the mold corresponds to about 2 liter. This soft savory Gugelhopf (or Kugelhopf or Gugelhups) is perfect to be served (if possible lukewarm) as appetizer with some wine and it goes always very quickly.

Variations:

  • substitute walnuts with pecan or almonds
  • add chopped rosemary or thyme
  • substitute bacon by diced cheese
  • add fried onion rings
  • substitute pork bacon by dried smoked beef or turkey bacon

Speckgugelhopf with Walnuts - (Sourdough Version)

  • Servings: 12
  • Difficulty: medium
  • Print

Ingredients

Activated starter

  • 100 g sourdough starter
  • 100 g water
  • 100 g flour

Dough

  • 175 ml milk
  • 350 g flour
  • 2 teaspoons salt
  • 150 g butter or margarine, melted
  • 1 egg

Additions for the taste

  • 200 g country bacon whole, skin removed
  • 1/2 cup walnuts (pecans works well as well), coarsely chopped

Procedure

  1. For this recipe, you have to activate the starter combining the sourdough starter you kept in the fridge with the same amount of each water and flour (each 100 g). Best do it the evening before and loosely cover in a bowl; it should be ready after about 10-12 hours at room temperature. At this time starter should be very active and spongy.

Note: his is left to mature (ferment) until ready to be used to mix into a dough.

  1. Now it’s time to add the ingredients for the dough. Add the milk, the 350 flour, the salt, the butter and the egg.
  2. Knead with the hock until it looks smooth and it begins to loosen from the walls. Cover and let rise until it doubles the volume. Depending on the kind of your culture, this can take 4-8 hours.
  3. Dice the bacon into 5-8 mm cubes and roast in in a pan. If it loos to much fat, drain it.
  4. Bring bacon and nuts into the risen dough it over several times. I don’t knead it in order to keep the dough as soft as possible.
  5. Make a hole into the center of the dough and place it in the prepared tin (please butter it before; you may also use the fat of the bacon).
  6. Cover and let rise in a warm place until it at least doubles the volume. This may take about 2-3 hours.
  7. Bake for approximately 45-50 minutes in the lower half of an oven preheated to 200°C. If notice that during the baking time the surfaces begins to turn to dark, cover loosely with aluminum foil.
  8. Wait a few minutes before unmolding and serve it possible lukewarm.

Autor: https://artandkitchen.wordpress.com/

This slideshow requires JavaScript.

Day 40 Stay at Home or In the Garden: Vegetable Tart with Seeds

Parwin suggested this versatile recipe for a “Stay at Home recipe exchange” game. This came out so delicious, that I thought it would be a good idea to share this for our friends.

As the recipe does not specify the ingredients, your are really free to use what you have on hand and make a delicious meal for you family.

Below I will give you the recipe and here my choices.

  • Dough: home made with sourdough
  • Pesto: red and green pesto Genovese
  • Vegetables: red peppers and defrosted green tomatoes form the garden (picked in fall as we removed the plants form the vegetable garden), sliced red onion
  • Seeds: pine nuts, pumpkin, chopped roasted pistachio
  • Herbs: parsley, basil and oregano
  • Salt: Basil salt

Vegetable Tart with Seeds

  • Servings: 4
  • Difficulty: easy
  • Print

Ingredients

  • Dough: readymade or self-made (any kind, but not sweet)
  • Pesto (any kind)
  • Vegetables, sliced or in small pieces, fresh or defrosted
  • Seeds as pumpkin, sesame, almonds, pine nuts (any kid)
  • Fresh herbs as parsley, oregano, thyme or basil
  • Salt and pepper, to taste

Procedure

  1. Place the dough on you baking try.
  2. Spread the pesto over the dough.
  3. Add vegetables.
  4. Top with seed.
  5. Adjust salt and pepper to taste.
  6. Bake about 25 min at 180°C or as needed (time depends on the dough and the toppings); you may also bake it at higher temperatures, but simply check when the bottom is ready
  7. Remove from the oven and serve with fresh herbs.
  8. Place salt and pepper on the table.

  https://artandkitchen.wordpress.com/

Day 39 Stay at Home or In the Garden: Green Bean Terrine

Make a surprise to your family serving a slice of this vegetable terrine with some spiced sauce as the Canary mojo rojo. This served with a hunk of crusty bread, any salad greens, cheese, cured meat, smoked salmon or what you like, makes an elegant brunch or a light meal for warmer days.

Green Bean Terrine

  • Servings: 4
  • Difficulty: easy
  • Print

Ingredients

  • Salted water
  • 400 g grean beans (I used the flat ones), trimmed
  • 2 tablespoons olive oil
  • 1 small onion, chopped
  • 1 garlic clove, chopped
  • 1 small tin of mushrooms (200 g drained)
  • 4 eggs
  • 100 ml heavy cream
  • 5 tablespoons cooking liquid from the beans
  • 2 teaspoons ginger, grated
  • Salt and pepper to taste

Procedure

  1. Preheat the oven to 160°C-
  2. Boil the beans in salted water add the green beans and cook for 10 minutes, until tender but still firm to the bite. Drain the beans.
  3. In the meantime fry onion and garlic with the oil until just tender, then add the drained mushrooms. After one minute, remove from the heat.
  4. Whisk the eggs with the cream and with the cooking water. Season with the ginger, salt and pepper.
  5. Line a terrine with aluminum foil and coat it with oil.
  6. Pour a few spoons of egg mixture, arrange over this first half of the beans, then the mushrooms mixture, after this the second half of the beans and finally pour gently the remaining egg mixture.
  7. Bake in the oven for about 25 minutes until firm and until the tip of a knife inserted into the center comes out clean.
  8. Remove from the foil Serve warm or cold.

 Note: Traditionally this kind of preparations should be cooked placing mold of the terrine into a bigger mold (roasting pan) with boiling water. I did not do it in this way and the simple baking in the oven worked well for me.

Autor: https://artandkitchen.wordpress.com/

Day 36 Stay at Home or In the Garden: Quick Salmorejo

Salmorejo is a fresh, thick, pink-orange soup consisting of tomatoes, bread and garlic witch is topped with hard boiled eggs and diced jamon serrano (serrano ham). A few days ago I posted the original recipe; now it’s time to post my super quick version for the days you may not have time to wait, but you wish this something fresh and tasty. In these days we try to avoid going out (Coronavirus lockout) and going shopping, we use what we have in the pantry and we adapt the recipes to the ingredients we have on hand.

Salmorejo Cordobés

  • Servings: 4
  • Difficulty: easy
  • Print

Ingredientes

  • 1 tins canned crushed tomatoes (400 g)
  • 1 cup ice cubes
  • 100 ml oilve oil
  • 1 tablespoon white balsamic vinegar
  • 3 tablespoons tomatoes paste, to taste
  • 1 garlic clove
  • 1 small white bread, diced of about 150 g
  • More water or ice cubes, as necessary
  • 10 g salt, or to taste
  • 2 eggs, hard boiled, peeled and diced
  • 100 g ham or bacon, diced
  • Olive oil to drizzle

Preaparation

  1. Place all the content of the tin in the stand mixer, add the ice cubes, the oil, the vinegar, the tomatoes paste and the garlic; pulse until smooth.
  2. Add the bread piece by piece and pulse until smooth. During this step add more water or ice cubes if necessary.
  3. Add salt and more tomatoes to taste if necessary.
  4. In a frying skillet roast the ham or the bacon to taste.
  5. Season with salt and vinegar to taste. Pulse shortly.
  6. Pour the salmorejo in bowl, top with egg and ham or bacon and drizzle a few drops of olive oil.

Autor: https://artandkitchen.wordpress.com/