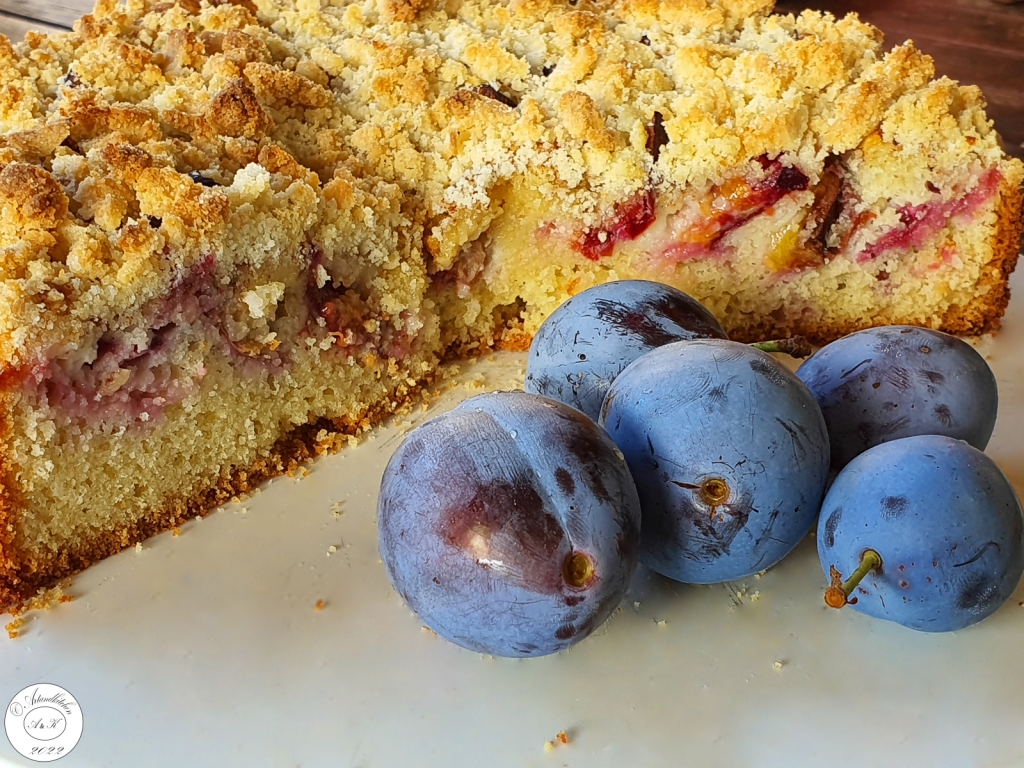
This sumptuous delicious almond cake is topped with plums and perfumed with cinnamon. It has a soft base, a juicy fruity layer and at the same time it has a crunchy topping.
I imagine that this recipe could be used for many kind of fruits. Not only apricots, peaches, nectarines, but also apples, pears and why not, many kind of berries.
100 g ground almonds (minus almonds used for the tin)
30 g flour
50 g sugar
50 g butter
Preparation
Preheat the oven to 175°C (convection oven) or 180°C (conventional oven).
Coat the tin (I used a 26 cm wide springform) with oil or butter and dust with ground almonds.
For the cake, put the oil, sugar, eggs, flour, baking powder, vanilla, ground almonds and yogurt in a big bowl. Beat with an electric whisk until smooth and pour this batter into the tin.
Arrange the plums vertically pushing them partially into the sponge batter and dust with cinnamon to taste.
Put all the crumble ingredients in a bowl, cut in the butter with a forj and rub together with your hands until crumbly. Finally scatter the crumble over the plums
Bake for about 50 minutes until done (test: a skewer poked into the cake mixture comes out clean but plums will remain sticky).
Let cool down on a wire rack.
Serving suggestion:
Serve cold with plain yogurt, sour cream or whipped cream
Combine together and sift well flour and cornstarch.
In a big bowl beat to stiff picks the egg whites gradually add the sugar and beat until very thick and glossy.
While the mixer is busy beating up those eggs and sugar, prepare one 26 cm spring-form by greasing it with butter and dusting it with four. Preheat the oven to 170°C.
Add eggs yolks as well as vanilla and slowly until incorporated.
Spoon half the flour mixture into the egg mixture. Using a spatula, gently fold in the flour. Do not use the electric mixer to add the flour, since this would deflate all the lovely air pockets that will help the cake to rise. Add the second half of the flour and again fold it in gently. Make sure to lift the mixture from the very bottom of the bowl as you fold in the flour.
Spread it out into the spring-form evenly using the spatula. Bake for 30 minutes at 170°C or until done (toothpick test).
Remove from the oven and place on a grid to cool down.
In the meantime prepare the coffee brush combining well all the ingredients until the sugar is dissolved.
Combine all the ingredients for the cream with an electric mixer.
Place the top layer upside down on your cake-plate. Brush half of the coffee mixture and spread with a spatula more or less one quarter of the cream. Grate some dark chocolate on the surface of the cream. Repeat with the second layer, coffee, cream and chocolate.
To finish place the bottom layer (upside down) on the top, spread another quarter of cream and dust with the chocolate. Place the remaining cream into a small plastic bag, cut the tip and pipette the cream to decorate the cake.
Place into the fridge for at least 4 hours before serving.
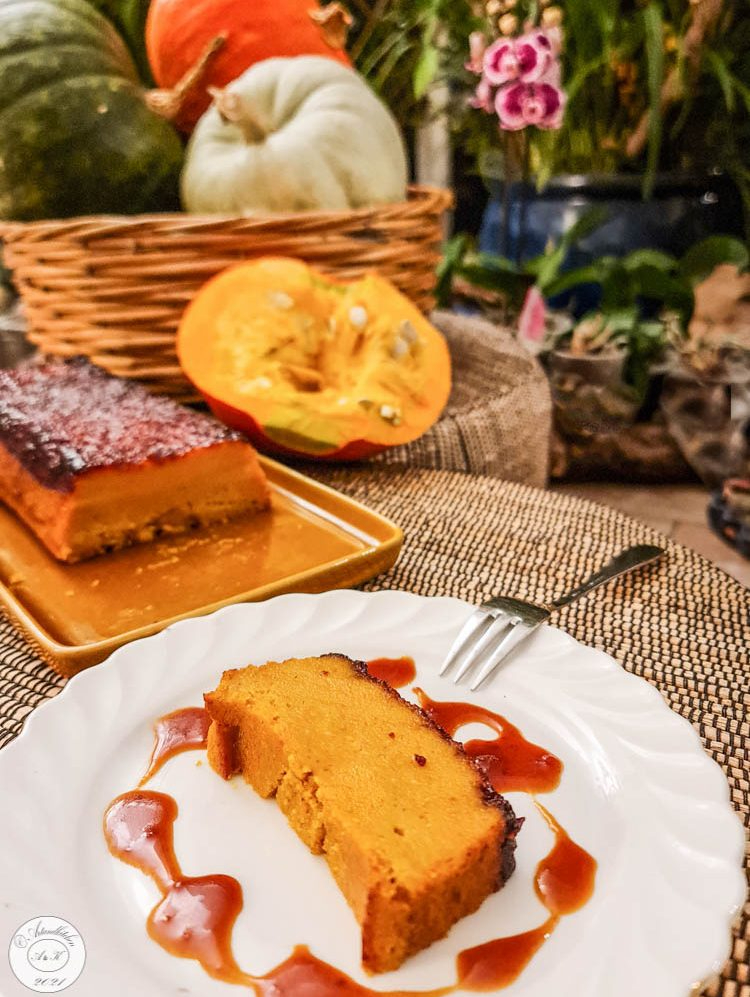
It’s pumpkin time and this recipe is an easy way for a tasty recipe and yummy dessert.
I used fresh pumpkin from the garden, which I previously baked und the microwave (10 minutes at max) and blended after cooling down.
How to prepare caramel sauce directly into the mold; Preheat oven to 200°C. Lightly grease your mold with butter. Scatter 50 g brown sugar to the baking dish and 2 tablespoons butter spreading evenly. Place in the oven until you see it begins to turn lightly darker. Remove from the oven and whisk shortly. Return to the oven and continue to bake a few minutes until a brown color is reached (be careful, do not burn it). Let cool in the mold.
In Thailand you will find many different versions of this popular dish, which turned into one of the most favourite dishes for travellers.
Weekday recipe with wow effect!
This recipe may serve you as a suggestion.
I love crunchy ingredients, for this reason I opted to set aside the cashew and the roasted onions and combine them to the chicken just before serving. On the other hand the chicken turned out very soft and incredible delicious.
A few ideas of possible additions: roasted broccoli florets, bok choy, peas, oyster sauce (for the sauce) and orange juice.
Fronds are those cute frilly light green leafy things attached to the stalks that grow out of a fennel bulb. They look like fresh dill, and they have a light taste similar to aniseeds. I grow fennels in my garden especially for these, I add this to spinach or chard to make the Greek kaltzunias (little small pies) and to attract butterflies in my garden. If you buy fennel with these, don’t throw these away and if you do not need them at the moment, freeze them! If you do not get them, then replace them with tinny fennel bulb slices.
The origin of fennel and orange salad is not completely known, but it may have its roots in the Arab world and come to Europe after the invasions of Spain and. The orange salad was created as a poor dish (wild fennel can be found at the border of many roads) and it doesn’t require cooking. Today, the fennel and orange salad is known all over the world and it is served as an appetizer/salad or as a final dish after an important meal.
I love to collect fennel fronds if traveling in Greece in Early spring, the same period as oranges get ripe.
In this recipe I completed the ingredients with avocado for its soft texture and the taste which combines well with citrus, In addition a roasted pine nuts give a welcome crunchy texture.
For the dressing I opted for some white balsamic vinegar flavoured with honey and Dijon mustard.
Green salad leaves to cover the bottom and the sides of the serving bowl, washed
2 ripe but firm avocados (reserve some slices for decoration drizzled with lemon juice)
1 tablespoon lemon juice
2 oranges peeled and diced (make a few slices and reserve for decoration)
2-4 tablespoons fennel fronds, chopped (reserve some for the topping)
2-4 tablespoons green onions slices (reserve some for the topping)
Dressing
2 tablespoons white balsamic vinegar
1 tablespoon lemon juice
1 tablespoon Dijon mustard
4 tablespoons olive oil
2 teaspoons honey
Salt and pepper to taste
Topping
Reserved herbs
2 tablespoons pine nuts, lightly roasted
Procedure
Arrange the green salad in the bowl.
Peel and slice the first avocado, place then in another bowl and sprinkle with the lemon juice and toss well with your hands. Peel and slice the second avocado add this to the first and gently again toss them together.
Add the other ingredients for the salad over the avocados.
Combine well the ingredients for the dressing.
Pour the dressing over the salad and very gently toss them together.
Place the mixture over the arranged salad leaves, decorate with the reserved avocado and orange slices and sprinkle with the herbs and the pine nuts
ماست و خیار Mast-o-khiar is a delicious, cooling and very popular Persian dish that is served with most meals. You will find the combination of yogurt and cucumbers in Greece (Tsatziki), but also in many other Balkan and Arabic countries and as well from Turkey to India (Raita).
The use of rose petals (fresh or dried) and rosewater for cooking was popular all over the Middle East and spread to Europe during the Middle Ages. However rosewater had been replaced by vanilla once world exploration had been brought from America to Europe.
About 20 years ago we planted in our garden a very strong scented white and red striped rose, since then its petals had been used in our cooking for several sweet recipes and we prepared hundreds of rose jam jars.
The basic ingredients for Mast-o-Khiar are yogurt, cucumber, mint, rose petals, salt and garlic. Other herbs can be added as well as chopped walnuts and raisins.
Tip: skip the cucumber for a delicious sauce for salad.
Cover the bottom of a Springform with baking paper.
For the base: Brush with the melted butter and sprinkle with the sugar. Arrange Rhubarb on it.
In a bowl, whisk together the butter, the yogurt, the sugar and the vanilla sugar. Add the eggs and whisk until well combined.
In another bowl, sift together flour and baking powder.
Add the dry mix to the wet mix and incorporate well with a spatula.
Spoon the batter over the arranged rhubarb and smooth well with a spatula.
Bake at 200°C/400°F for about 30-35 minute or until risen, golden brown and a skewer inserted into the middle of the cake comes out clean.
Remove from the oven and let sit for about 5 minutes. Run a knife around the edges and carefully remove the border of the Springform and let cool down completely on a grid.
Invert on a serving plate, remove the bottom of the Springform and carefully the baking paper.
Serving suggestion: garnish with chopped roasted pistachios.
Wild greens constitute one of the greatest capital of Cretan cuisine. No one knows exactly how many different species of plants are used for human consumption and helped these people to survive during wars and occupation times. I read that more than 120 herbs from the coastal zones to the higher mountain regions have been identified and counted.
Picking wild greens is a very enjoyable activity and the prepared meals are super healthy food!
For this recipe I used self-seeded Swiss chard form last year who is sprouting here and there in my vegetable garden. A great gift form the nature.
For the “Cretan” flavourful taste, I added mint and dill and some feta.
Usually these greens pies are prepared in the oven and the dough used for this is the filo.
One of the specialties of Sfakia are the “Sfakianopites”: round flat pies filled with local mizithra cheese, pan-fried (without oil or butter) and then, served with a generous drizzle of Cretan honey.
For this pies I used the technique of the sfakianopites and worked very well.
½ cup sourdough starter (or ¼ cup water + ¼cup flour + 1/4 teaspoon dry yeast)
1 cup water
3 cups flour
1 tablespoon salt
Filling
300 greens (I used the green part of Swiss chards)
2 tablespoons olive oil
1 medium onion, finely chopped
3 spring onions, finely chopped, tender green part as well
3 tablespoons cup finely chopped fresh spearmint
2 tablespoons finely chopped dill
200 g crumbled feta
Salt and pepper to taste
Prodecure:
Combine the sourdough starter with the water and the first cup of flour for the first rising into a big bowl, cover and let sit until spongy. The time depends of the kind of yeast (if using sourdough starter often I combine them the evening before or early in the morning) and the temperature.
Add the the other two cups of flour and the salt for the second rising knead shortly and let lit for about 20 minutes. Now knead again until smooth. I perform this step directly in the bowl using a dough spatula and folding over the bread until done. Let rise a few hour until doubled. During this time prepare the filling.
Wash the greens and drain very well. Then slice them.
Heat the oil and fry the onion until translucent. Add the greens and cook stirring from time to time until the liquid is almost adsorbed.
Add the herbs and combine well.
Add the feta and season to taste with salt and pepper. Place on in a bowl to cool down.
When the dough is soft, divide it into 6 pieces. Make 6 portions of filling. Note: you may make also more pieces/portions and make smaller pitas.
Roll out the dough to the size of about 15 cm on a well-floured surface. Place the filling on it and carefully close the filling into the dough trying to exclude as much air as possible.
Dust well with flour and slowly roll this out to the desired size. I made round of about 25 cm. Do not staple them, but place them on a well-floured surface until cooking time. Best if you would in team and somebody helps you the roast the pitas while you roll them out.
Heat a skillet and roast dry on both sides until browned. Note: We decided to cook them on the open fire.
Serve if warm with yogurt sauce.
Leftovers may be kept in the fried for a few day or be frozen.
I made this cake for the first time many years ago, but it was so delicious that my family did not forget this melting in the mouth cake, so that they asked me for this a few times again.
Grease and dust with flour a 24-26 cm (9-10 inches) round cake pan. (Springform).
Sift together in a bowl the dry ingredient (flour, baking powder and salt).
In a large mixing bowl (or food processor), cream the butter, then slowly add the sugar, blending well. Add the eggs one at a time, beating well after each is added.
In another bowl, mix together the orange juice & zest.
Add this orange mixture spoon by spoon to the butter/sugar/egg mixture beating constantly.
Step by step add the dry mixture until well incorporated.
Pour the batter into the prepared cake mold bake for 40-45 minutes or until through (I recommend the toothpick test).
Cool in the pans on a wire rack for about 15 minutes, then remove from the pans and cool completely.
Slice the cake into 2 layers.
For the frosting, melt the butter, then combine it with the orange juice and the zest, beating well. Slowly add the powdered sugar and beat well until smooth.
Place the bottom cake layer on a serving plate and using, using about 1/3 of the frosting, frost the first layer. Put the second layer upside right on the first layer. Frost the top and the sides of the cake, or only the top allowing some of the frosting to run down the sides.
Never throw your stale bread away! You can make breadcrumbs, bread pudding, meatballs, and French toasts, and, and, and! Did you know you could also prepare a wonderful pizza? Once again, this is great opportunity to make your family happy with this great meal and at the same time, your stale bread will be gone very quickly!