Plum Almond Crumble Cake

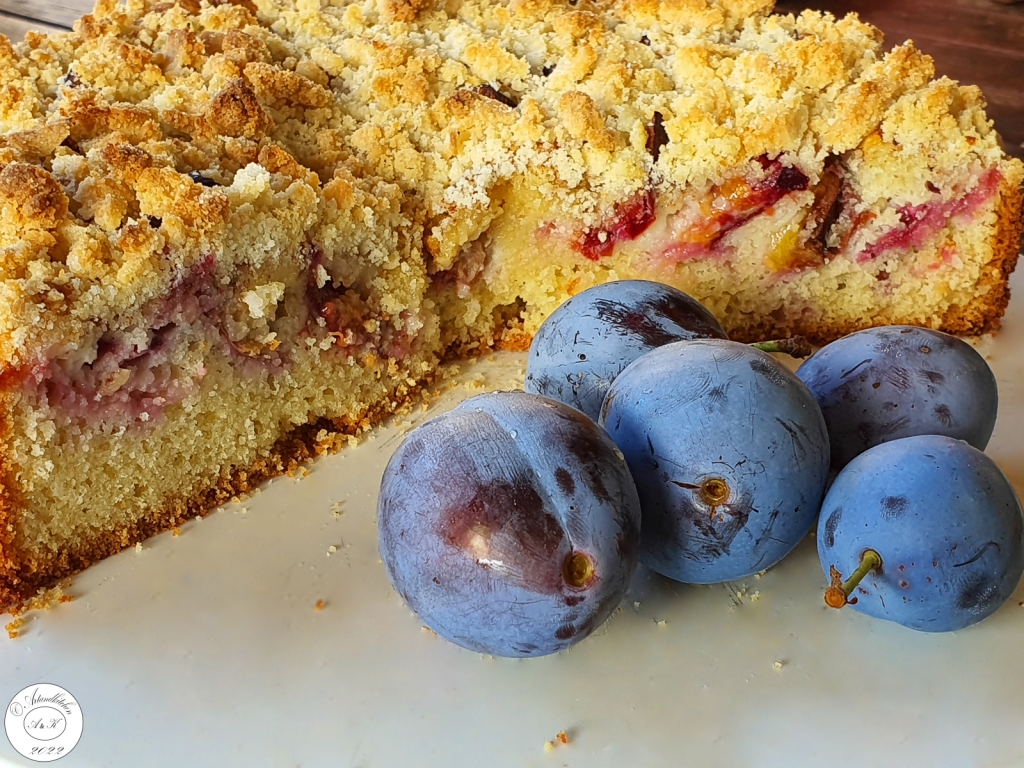
This sumptuous delicious almond cake is topped with plums and perfumed with cinnamon. It has a soft base, a juicy fruity layer and at the same time it has a crunchy topping.

I imagine that this recipe could be used for many kind of fruits. Not only apricots, peaches, nectarines, but also apples, pears and why not, many kind of berries.

Plum Almond Crumble Cake

  • Servings: about 12
  • Difficulty: easy
  • Print

Ingredients

Tin preparation

  • Oil or butter to coat the tin
  • About 2 tablespoons ground almonds

Cake

  • 80 g oil
  • 185 g sugar
  • 4 large eggs
  • 250 g flour
  • 2 tsp baking powder
  • 1 tsp vanilla powder
  • 100 g ground almonds
  • 85 g plain Greek yogurt (10 %fat)

Topping

  • 500 fresh plums , quartered and stoned
  • Cinnamon to dust, optional

Crumble

  • 100 g ground almonds (minus almonds used for the tin)
  • 30 g flour
  • 50 g sugar
  • 50 g butter

Preparation

  1. Preheat the oven to 175°C (convection oven) or 180°C (conventional oven).
  2. Coat the tin (I used a 26 cm wide springform) with oil or butter and dust with ground almonds.
  3. For the cake, put the oil, sugar, eggs, flour, baking powder, vanilla, ground almonds and yogurt in a big bowl. Beat with an electric whisk until smooth and pour this batter into the tin.
  4. Arrange the plums vertically pushing them partially into the sponge batter and dust with cinnamon to taste.
  5. Put all the crumble ingredients in a bowl, cut in the butter with a forj and rub together with your hands until crumbly. Finally scatter the crumble over the plums
  6. Bake for about 50 minutes until done (test: a skewer poked into the cake mixture comes out clean but plums will remain sticky).
  7. Let cool down on a wire rack.

Serving suggestion:

  • Serve cold with plain yogurt, sour cream or whipped cream
    • Serve lukewarm with vanilla ice cream

Autor: https://artandkitchen.wordpress.com/  

Tiramisu Cake with Amaretto

In this blog I’ve already posted the recipe of our favorite tiramisu recipe with amaretto into a cake.

I replaced the raw eggs with more Greek yogurt which gives to the cake an additional fresh component and safer for the storage.

Make you family all tiramisu lovers happy with this simple recipe.

Tiramisu Cake with Amaretto

  • Servings: 12
  • Difficulty: medium
  • Print

Ingredients

Sponge

  • 110 g flour
  • 20 g cornstarch
  • 4 eggs (divided)
  • 120 g sugar
  • 1 teaspoon vanilla essence

Coffee brush

  • 100 ml strong coffee
  • 20 g sugar
  • 50 ml amaretto liqueur, quantity to taste J

Cream

  • 500 g mascarpone
  • 200 g Greek yogurt
  • 120 g sugar
  • 2 teaspoon lemon zest, grated (variation: orange zest); optional
  • 50 ml coffee

Dusting

  • 50 g dark chocolate, grated  (quantity to taste)

Procedure

  1. Combine together and sift well flour and cornstarch.
  2. In a big bowl beat to stiff picks the egg whites gradually add the sugar and beat until very thick and glossy.
  3. While the mixer is busy beating up those eggs and sugar, prepare one 26 cm spring-form by greasing it with butter and dusting it with four. Preheat the oven to 170°C.
  4. Add eggs yolks as well as vanilla and slowly until incorporated.
  5. Spoon half the flour mixture into the egg mixture. Using a spatula, gently fold in the flour. Do not use the electric mixer to add the flour, since this would deflate all the lovely air pockets that will help the cake to rise. Add the second half of the flour and again fold it in gently. Make sure to lift the mixture from the very bottom of the bowl as you fold in the flour.
  6. Spread it out into the spring-form evenly using the spatula. Bake for 30 minutes at 170°C or until done (toothpick test).
  7. Remove from the oven and place on a grid to cool down.
  8. In the meantime prepare the coffee brush combining well all the ingredients until the sugar is dissolved.
  9. Combine all the ingredients for the cream with an electric mixer.
  10. When the cake is cooled down, cut it into 3 layers. If you need some help for this step, check https://www.youtube.com/watch?v=RHyGSrCm8c8&ab_channel=GialloZafferanoItalianRecipes
  11. Place the top layer upside down on your cake-plate. Brush half of the coffee mixture and spread with a spatula more or less one quarter of the cream. Grate some dark chocolate on the surface of the cream. Repeat with the second layer, coffee, cream and chocolate.
  12. To finish place the bottom layer (upside down) on the top, spread another quarter of cream and dust with the chocolate. Place the remaining cream into a small plastic bag, cut the tip and pipette the cream to decorate the cake.
  13. Place into the fridge for at least 4 hours before serving.

Autor: https://artandkitchen.wordpress.com/  

Ekmek Kataifi – Greek Pastry Topped with Custard and Whipped Cream

A few years ago on Crete a Greek friend offered us this wonderful cake and she gently shared her recipe. I still had the notes and finally now I decided to write this in my blog. Her recipe is a sugar-reduced one, as most of the recipes requires double quantity of syrup, I also noticed that she reduced the fat of the cream adding beaten egg white. If you don’t feel safe eating raw eggs please skip it or double the cream quantity!

Perhaps you noticed that the name “Ekmek Kataifi” doesn’t sound Greek: historical this recipe was a bread pudding, created during the Ottoman empire and served during the Ramadan time combined with kaimak (a creamy cheese similar to mascarpone).

Note: sometimes you in Turkish shops you can buy already roasted kataifi in the shape of a round cake; in this cake skip the first two steps.

Ekmek Kataifi – Greek Pastry Topped with Custard and Whipped Cream

  • Servings: 12
  • Difficulty: easy-medium
  • Print

Credit :Artandkitchen

Ingredients

  • Base

    • 250 g frozen kataifi pastry
    • 50 g butter, melted

    Syrup (may be doubled if you wish)

    • 100 g sugar
    • 50 ml water
    • 1 teaspoon fresh lemon juice
    • 1/4 teaspoon mastic, powder (optional)

    For the Custard

    • 3 tablespoons fine semolina
    • 1 tablespoon cornstarch
    • 70 g sugar
    • 1 teaspoon vanilla
    • 3 egg yolks
    • 500 ml milk

    Whipped cream

    • 100 ml heavy cream, chilled
    • 1 egg white, from very fresh egg (skip and double the quantity of heavy cream if preferred)
    • 2 tablespoons powdered sugar

    Topping

    • roasted slivered almonds or pistachios, for serving
    • 8 candied cherries (optional)

Directions

  1. Preheat the oven to 160 °C.
  2. To begin making the base. Make the Kataifi pastry as fluffy as possible; spread it on the Springform (of about 24 cm) and brush with the melted butter. Toast the Kataifi strands until golden brown, this takes about 30-40 minutes.
  3. In the meanwhile, prepare the syrup by boiling the sugar with the water in a small saucepan for about 5 minutes. You can also add some mastic powder. Remove from the heat and stir in the lemon juice and spoon the hot syrup over the toasted pastry base.
  4. Combine semolina, cornstarch and half of the sugar in small bowl; whisk in egg yolks and a few tablespoons of cold milk; whisk to remove any lumps. In another pot (or simply in the microwave) heat the milk with the rest of the sugar. Before this comes to boil, remove this from the heat and add it to the egg mixture stirring constantly; Place the saucepan over medium heat and let the cream thicken, stirring constantly. Remove from the heat and let cool down until lukewarm.
  5. Spread the custard evenly over Kataifi. Let it cool to room temperature, cover with cling film and put in the fridge. Leave best overnight as so that the tastes will bind better.
  6. Make the whipped cream just before serving: in a clean bowl beat egg white into stiff peaks, add sugar and beat again until glossy. In another bowl, preferably chilled, beat chilled cream. Gently fold beaten egg whites into the whipped cream and spread over the cold cream.
  7. Sprinkle with roasted slivered almonds, top with cherry and serve best with a cup of real Greek coffee!


Black Forest Mocha

A great surprise for your family or friends: a warm dessert with a caffeine kick and more!

Black Forest Mocha

  • Servings: 1
  • Difficulty: easy
  • Print

You need:

  • 30 g black chocolate ( or milk chocolate if preferred)
  • 1 small cup of freshly brewed coffee, best if espresso
  • 1 tablespoon chocolate syrup (optional)
  • 2 tablespoons Kirsch (cherry brandy), quantity to taste
  • 1/2 cup whipped cream (sweetened if preferred)
  • Cherry syrup
  • Additional whipped cream, for topping
  • Shaved chocolate, for topping

Procedure

  1. Cut chocolate into pieces and place it in a microwave proof bowl or in a saucepot.
  2. Top with hot coffee and heat (microwave or stovetop) and stir to dissolve completely. Add Kirsch and stir once.
  3. Combine whipped cream with cherry syrup and stir only shortly.
  4. Poor the coffee into the cup, spoon the prepared cherry-whipped cream on top.
  5. Dot with little more white whipped cream and top with the shaved chocolate.
  6. Serve immediately and enjoy.

Autor: https://artandkitchen.wordpress.com/


Cuajada Maracuja Dessert

Cuajada Maracuja Dessert

The intense flavor of maracuja makes these simply and super light dessert exotic and enjoyable.

After the festivities I think we should try to stay light without missing the taste.

The help came from this incredible tasty fruits, the cuajada envelopes I got from Spain and the super light cream cheese I have at home. I tried replacing the sugar by aspartame, but you may also try with stevia or sugar of course.

This make 4 normal sized portions or 8 mini one as in my picture.

You need:

Curd:

  • 500 ml milk (2 1/2 cups)
  • 1 cuajada envelope (I always use Royal cuajada, but Rennet could work as well, the rennet curdling following the packet instructions!)
  • 150-200 g (one package) light cream cheese
  • 50 g sugar or the corresponding amount sweetener

Maracuja jelly:

  • 125 ml tropical juice
  • 125 ml water
  • 2 tablespoons sugar or the corresponding amount sweetener
  • 1 envelope jelly powder for sweets (or the necessary amount for 250 ml liquid)
  • 1 or 2 maracuja fruits

Procedure:

  1. Pour 400 milk (2 cups) and into a medium sauce pan and bring to almost to boil.
  2. While milk is heating, pour the milk into a cup and mix with the contents of the cuajada envelope using a wire whip.
  3. Add light cream cheese and sugar (or substitute) to the heated milk and stir to dissolve. Check if you need more sweetener (depends on your taste).
  4. As soon as the milk-cheese mixture begins to boil, pour in the cuajada mixture and stir constantly. Remove from heat as soon as the mixture boils again.
  5. Pour into glasses of ramequin mold and let cool down for at least 2 hours.
  6. Bring juice, water sugar and jelly to boil stirring constantly.
  7. In the meantime open maracuja and spoon out the content.
  8. As soon it begins to boil and thickens remove from heat and pour over the chilled curd.
  9. Spoon the maracuja over the jelly and chill completely before serving.

Fried Black Locust Flowers

Fried Black Locust Flowers 5

Today I will propose one of my flowers recipes.

The black locust (Robinia pseudacacia) is now full in blossom. This plant is native to United States, but has been widely planted and naturalized, Europe, Africa and Asia and for this reason it is considered an invasive species in many areas.

Black Locust trees are considered an excellent nectar source for honey bees and believe me, honeybees go crazy for the flowers!

For about two weeks now we will enjoy the scent of flowers and at least once I will serve this flowers on a dish making beautiful sweets.

I fried the flowers and served them as sweets but you can also skip the sugar coating and serve these with a green salad for lunch.

You need:

o    12 black locust flowers racemes

o    2/3 cup flour

o    1 pinch baking powder

o    1 pinch salt

o    2/3 cup water or sweet white wine

o    1 tablespoon honey

o    Fresh oil to fry

o    Sugar for coating (optional)

Procedure:

  1. Place flowers in a bowl with iced water and turn gently to remove insects from them.
  2. Remove flowers form the water and place them on a cream kitchen towel to drain.
  3. Sift together flower, baking powder and salt. Now add water and sugar. Wish until you get a smooth batter. Let rest for 30 minutes. The batter should be fairly liquid.
  4. Dip the flower racemes one by one in the batter and then gently shake off any excess batter from the flowers and fry them in medium hot oil (160-170°C). In this way the flowers will get a lovely and crispy quickly without absorbing oodles of oil and without burning.
  5. Cook until golden and drain on kitchen pap paper.
  6. Coat them with sugar and serve.

Soft Walnut Chocolate Cake

Soft Walnut Chocolate Cake

I found this recipe on a German site and I adapted to my taste. The result is a soft moist walnut cake with orange flavor and an attractive chocolate topping.

The quantities correspond to a big rectangular cake (serves 20-24 persons) or two 9 inch round cakes.

You need:

Base:

o    225 g butter (1 cup)

o    250 g sugar (1 cup + 2 tablespoons)

o    1 orange, only zest grated

o    7 egg yolks

o    100 g plain Greek yogurt (6 tablespoons)

o    225 g plain flour (1 3/4 cups)

o    2 teaspoon baking powder

o    2 teaspoons vanilla powder

Topping:

o    7 egg whites

o    150 g powdered sugar (1 1/2 cups)

o    2 teaspoons lemon juice

o    2 tablespoon cornstarch

o    200 walnuts, peeled and roughly chopped (1 1/2 cups)

o    200 g dark chocolate, roughly chopped (1 1/2 cups)

Procedure:

  1. Preheat the oven to 200°C/400°F
  2. Mix butter with sugar until soft.
  3. Add orange zest and while beating one by one the egg yolks.
  4. Add yogurt, mix well again.
  5. Sieve in a bowl flour, baking powder and vanilla. Add this mixture to the creamy mixture.
  6. Spread the dough with a spatula in the cake form.
  7. In a fat free clean bowl beat egg whites until stiff.
  8. Slowly incorporate the powdered sugar in portions and mix until thick.
  9. Add lemon juice and cornstarch. Mix until well incorporated.
  10. Add walnuts and 100 g chopped chocolate. Fold under the mousse.
  11. Spread the mousse over the dough base.
  12. Reduce the heat of the oven at 180°C/350°F and bake for 30-35 minutes or until through (tooth stick test).
  13. Let cool dry on a grid.
  14. Place the remaining chocolate in a small plastic bag and make a knot.
  15. Place the bag in a bowl of hot water keeping the knot out of the water.
  16. When the chocolate is melted take out the bag. Knead the bag lightly with your fingers until you are sure the whole chocolate is melted. Cut an edge of the bag and drizzle the chocolate over the cake.

Sour Cherries Clafoutis

sour cherries clafoutis

Sour cherries (prunus cerasius) are closely related to the sweet cherries (Prunus avium), but are more acidic. For this reason they are not used raw; but they have a stronger aroma if cooked.

This is a classical recipe, that presents well and it’s not heavy. It’s really versatile as you can try it with different kind of berries.

You can make this lighter using fat reduced milk and other sweetener (for example “stevia”).

To enhance the taste you add to the custard one or two spoons amaretto or maraschino.

For the preparation of the custard I suggested to use the microwave as this is the easiest way to prepare it and will prevent sticking on the bottom of the pot.

You need:

  • 1 teaspoon butter fort the mold
  • 1 ½ – 2 cups of fresh sour cherries, pitted
  • 2 eggs
  • 1 cup of sugar
  • 5 tablespoons cornstarch
  • 2 cups of whole milk
  • 1 teaspoons of vanilla extract

Procedure

  1. Preheat the oven to 180°C/350F. Butter and lightly flour a 25 cm/9 inches mold or 2 smaller ones (as I did).
  2. In a microwave safe bowl whisk the eggs, sugar, salt, and flour together until smooth. You can make this in a saucepot and cook it at moderate temperature.
  3. Add the milk and vanilla extract. Whisk until smooth.
  4. Place the bowl in the microwave and heat at maximum for 3 minutes. Stir. Heat again for one minute and stir. Repeat until thickened.
  5. Pour half to f the custard in the mold, add half of the sour cherries, add the second half of the custard and top with remaining sour cherries.
  6. Cook for 40 minutes or until golden brown. The clafoutis will puff up quite a bit and will deflate while cooling.

Danish Braid with Ricotta and Sour Cherries Filling

Danish Braid 8

It was really a lot of work to prepare this Danish braid, but the effort was really worth.

I began this challenge the day in advance folding and chilling this wonderful dough following the recipe “Danish Braid” from Sherry Yard’s in The Secrets of Baking.

Finally the folded dough was in the refrigerator and I still had to take the decision what kind of filling I will take. Too late for such a decision, we went sleep.

In the morning as I was checking the fridge for some inspiration, I saw ricotta and a half pot of our sour cherries jam. This is the solution. The big problem was the jam because it was really thin. For this reason I used the ricotta as a wall to prevent floating away this precious juice. I decided to prepare only one big braid instead of two.

For the glaze I used powdered sugar with the addition of a small quantity of thick plain yogurt.

Danish Dough

Makes 2-1/2 pounds dough or one 1 pound dough

For the dough (Detrempe):

  • 1 ounce fresh yeast or 1 tablespoon active dry yeast
  • 1/2 cup whole milk
  • 1/3 cup sugar
  • Zest of 1 orange, finely grated
  • 3/4 teaspoon ground cardamom
  • 1-1/2 teaspoons vanilla extract
  • 1/2 vanilla bean, split and scraped
  • 2 large eggs, chilled
  • 1/4 cup fresh orange juice
  • 3-1/4 cups all-purpose flour
  • 1 teaspoon salt

For the butter block (Beurrage):

  • 1/2 pound (2 sticks) cold unsalted butter
  • 1/4 cup all-purpose flour

Detrempe:
  1. Combine yeast and milk in the bowl of a mixer fitted with the paddle attachment and mix on low speed.  Slowly add sugar, orange zest, cardamom, vanilla extract, vanilla seeds, eggs, and orange juice.  Mix well.
  2. Change to the dough hook and add the salt with the flour, 1 cup at a time, increasing speed to medium as the flour is incorporated.
  3. Knead the dough for about 5 minutes, or until smooth.  You may need to add a little more flour if it is sticky.  Transfer dough to a lightly floured baking sheet and cover with plastic wrap. Refrigerate for 30 minutes.
The Butter Block:
  1. Combine butter and flour in the bowl of a mixer fitted with a paddle attachment and beat on medium speed for 1 minute.  Scrape down the sides of the bowl and the paddle and then beat for 1 minute more, or until smooth and lump free.  Set aside at room temperature.
  2. After the detrempe has chilled 30 minutes, turn it out onto a lightly floured surface.  Roll the dough into a rectangle approximately 18 x 13 inches and ¼ inch thick.  The dough may be sticky, so keep dusting it lightly with flour.  Spread the butter evenly over the center and right thirds of the dough.  Fold the left edge of the detrempe to the right, covering half of the butter.  Fold the right third of the rectangle over the center third.  The first turn has now been completed.  Mark the dough by poking it with your finger to keep track of your turns, or use a sticky and keep a tally.  Place the dough on a baking sheet, wrap it in plastic wrap, and refrigerate for 30 minutes.
  3. Place the dough lengthwise on a floured work surface.  The open ends should be to your right and left.  Roll the dough into another approximately 13 x 18 inch, ¼-inch-thick rectangle.  Again, fold the left third of the rectangle over the center third and the right third over the center third.  No additional butter will be added as it is already in the dough. The second turn has now been completed.  Refrigerate the dough for 30 minutes.
  4. Roll out, turn, and refrigerate the dough two more times, for a total of four single turns.  Make sure you are keeping track of your turns.  Refrigerate the dough after the final turn for at least 5 hours or overnight.  The Danish dough is now ready to be used.  If you will not be using the dough within 24 hours, freeze it.  To do this, roll the dough out to about 1 inch in thickness, wrap tightly in plastic wrap, and freeze.  Defrost the dough slowly in the refrigerator for easiest handling.  Danish dough will keep in the freezer for up to 1 month.

Filling, Proofing, Baking

  • 1 cup ricotta
  • 1 tablespoon cornstarch
  • 1 tablespoon sugar
  • 1/2 teaspoon vanilla
  • 3/4 cup sour cherries jam
  1. Combine ricotta, cornstarch sugar and vanilla until smooth.
  2. Roll out the dough to a rectangle of about 20 to 18 inches (50 to 40 cm) on a baking paper sheet.
  3. Using a pizza cutter make cuts as shown in the photo. I used the leftovers to prepare two cute rolls (see photo).
  4. Place the ricotta filling in order to make walls and fill the jam in the center
  5. Braid as shown in the photos.
  6. Let rise until doubled for about two hours
  7. Bake in the preheated oven at 350°F/180°C for about 25-30 minutes (rotate once after the first 10 minutes) or until light brown.  I used a fan forced oven.

Clear Glaze:

  • 2 tablespoons sugar
  • 1 tablespoon water, hot
  1. While the braid is in the oven melt sugar with water.
  2. When the braid is done, take out of the oven and brush immediately the glaze.

White Glaze

  • 1/2 cup powdered sugar
  • 1 teaspoon plain yogurt
  1. Stir powdered sugar and plain yogurt together until smooth but still thick (add more powdered sugar if necessary).
  2. When the braid is still warm but not hot, place glaze in a small bag, close it tight (knot) and cut off an edge. Drip glaze over the braid.
  3. Enjoy your braid with your family or friends!

This slideshow requires JavaScript.

Ayam Goreng Balut Kacang (Fried Chicken with Peanut Coat)

Ayam Goreng Balut Kacang

This is another dish we enjoyed so much in Bali and we replicated it at home.

In Bali we got it with plain rice (nasi putih)  and a tomatoes salsa served in a pretty tomato basked; at home we served it a pineapple salad (pineapple, yellow and red bell peppers, green onions, grated ginger, soya sauce and some drops roasted sesame oil).

This was a great success at home as well; I need to keep this recipe in a safe place!

You need:

  • 1 kg chicken pieces, cleaned

Marinade:

  • 2 tablespoons lime juice
  • 2 cloves garlic, crushed
  • 1 tablespoon fresh ginger, grated (optional)
  • 1/2 teaspoon pepper powder
  • 1 teaspoon salt

Batter:

  • 4 tablespoons wheat flour
  • 2 tablespoons rice flour
  • 1/2 teaspoon pepper powder
  • 1 teaspoon salt
  • 3/4 cup water

Coating:

  • 1 cup peanuts, without skin and chopped

Preparetion:

  1. Cut chicken into 2 inch pieces or to taste.
  2. I removed the skin (personal taste) and left drumstick in one piece.
  3. Sprinkle chicken lemon juice, add garlic, ginger pepper and salt.
  4. Let rest for at least 30 minutes.
  5. In a bowl combine all the ingredient for the batter and stir until smooth.
  6. Dip each piece of chicken into the batter.
  7. Sprinkle and coat with the chopped peanuts.
  8. Fry in hot oil until dry lot and mature or fry in a pan on both side until golden and keep in the preheated warm oven until through and ready.

Serving suggestion: Serve with rice. You can serve it with a tropical salsa or with tomatoes salsa enriched with sambal.

Ayam Goreng Balut Kacang and Salad